¶ Table of contents
¶ Installing FELIX driver/firmware/software
Track the release roadmap here - https://atlas-project-felix.web.cern.ch/atlas-project-felix/user/releases.html
¶ FELIX driver
Please check the FELIX release page here to know the latest version of driver to be installed. For instance, for running YARR on CentOS7 machine, driver version 4.15.0 is supported with felix-distribution software version 5.0.2.
-
List of drivers are available at - https://atlas-project-felix.web.cern.ch/atlas-project-felix/user/dist/software/driver/
-
To check if there are any previously installed drivers on the system, run rpm -qa | grep tdaq
If a driver rpm is installed you’ll see a response like (depending on the version of driver installed):bash$ rpm -qa | grep tdaq tdaq_sw_for_Flx-4.14.0-2dkms.noarch -
To remove the exisitng version of driver, run rpm -e filename
Once this operation is complete you will be in a position to install the latest FELIX driver. -
To install the driver, follow the instructions from here - https://atlas-project-felix.web.cern.ch/atlas-project-felix/user/felix-user-manual/versions/4.0.6/5_software_installation.html#_5_2_1_driver_rpm_installation_instructions
-
Most importantly, you will need "superuser" privilege to install the driver from .rpm file. Use the "wget" command to copy the file on the host system from a https location. Then, once you have the right permissions, just do sudo yum install felix_driver_xxx.rpm.
-
To check if the driver is running or not, do lsmod | grep flx. The output will be something like:
flx 43300 0
Otherwise, to start the driver, you need superuser privilege and then do ./etc/init.d/drivers_flx start -
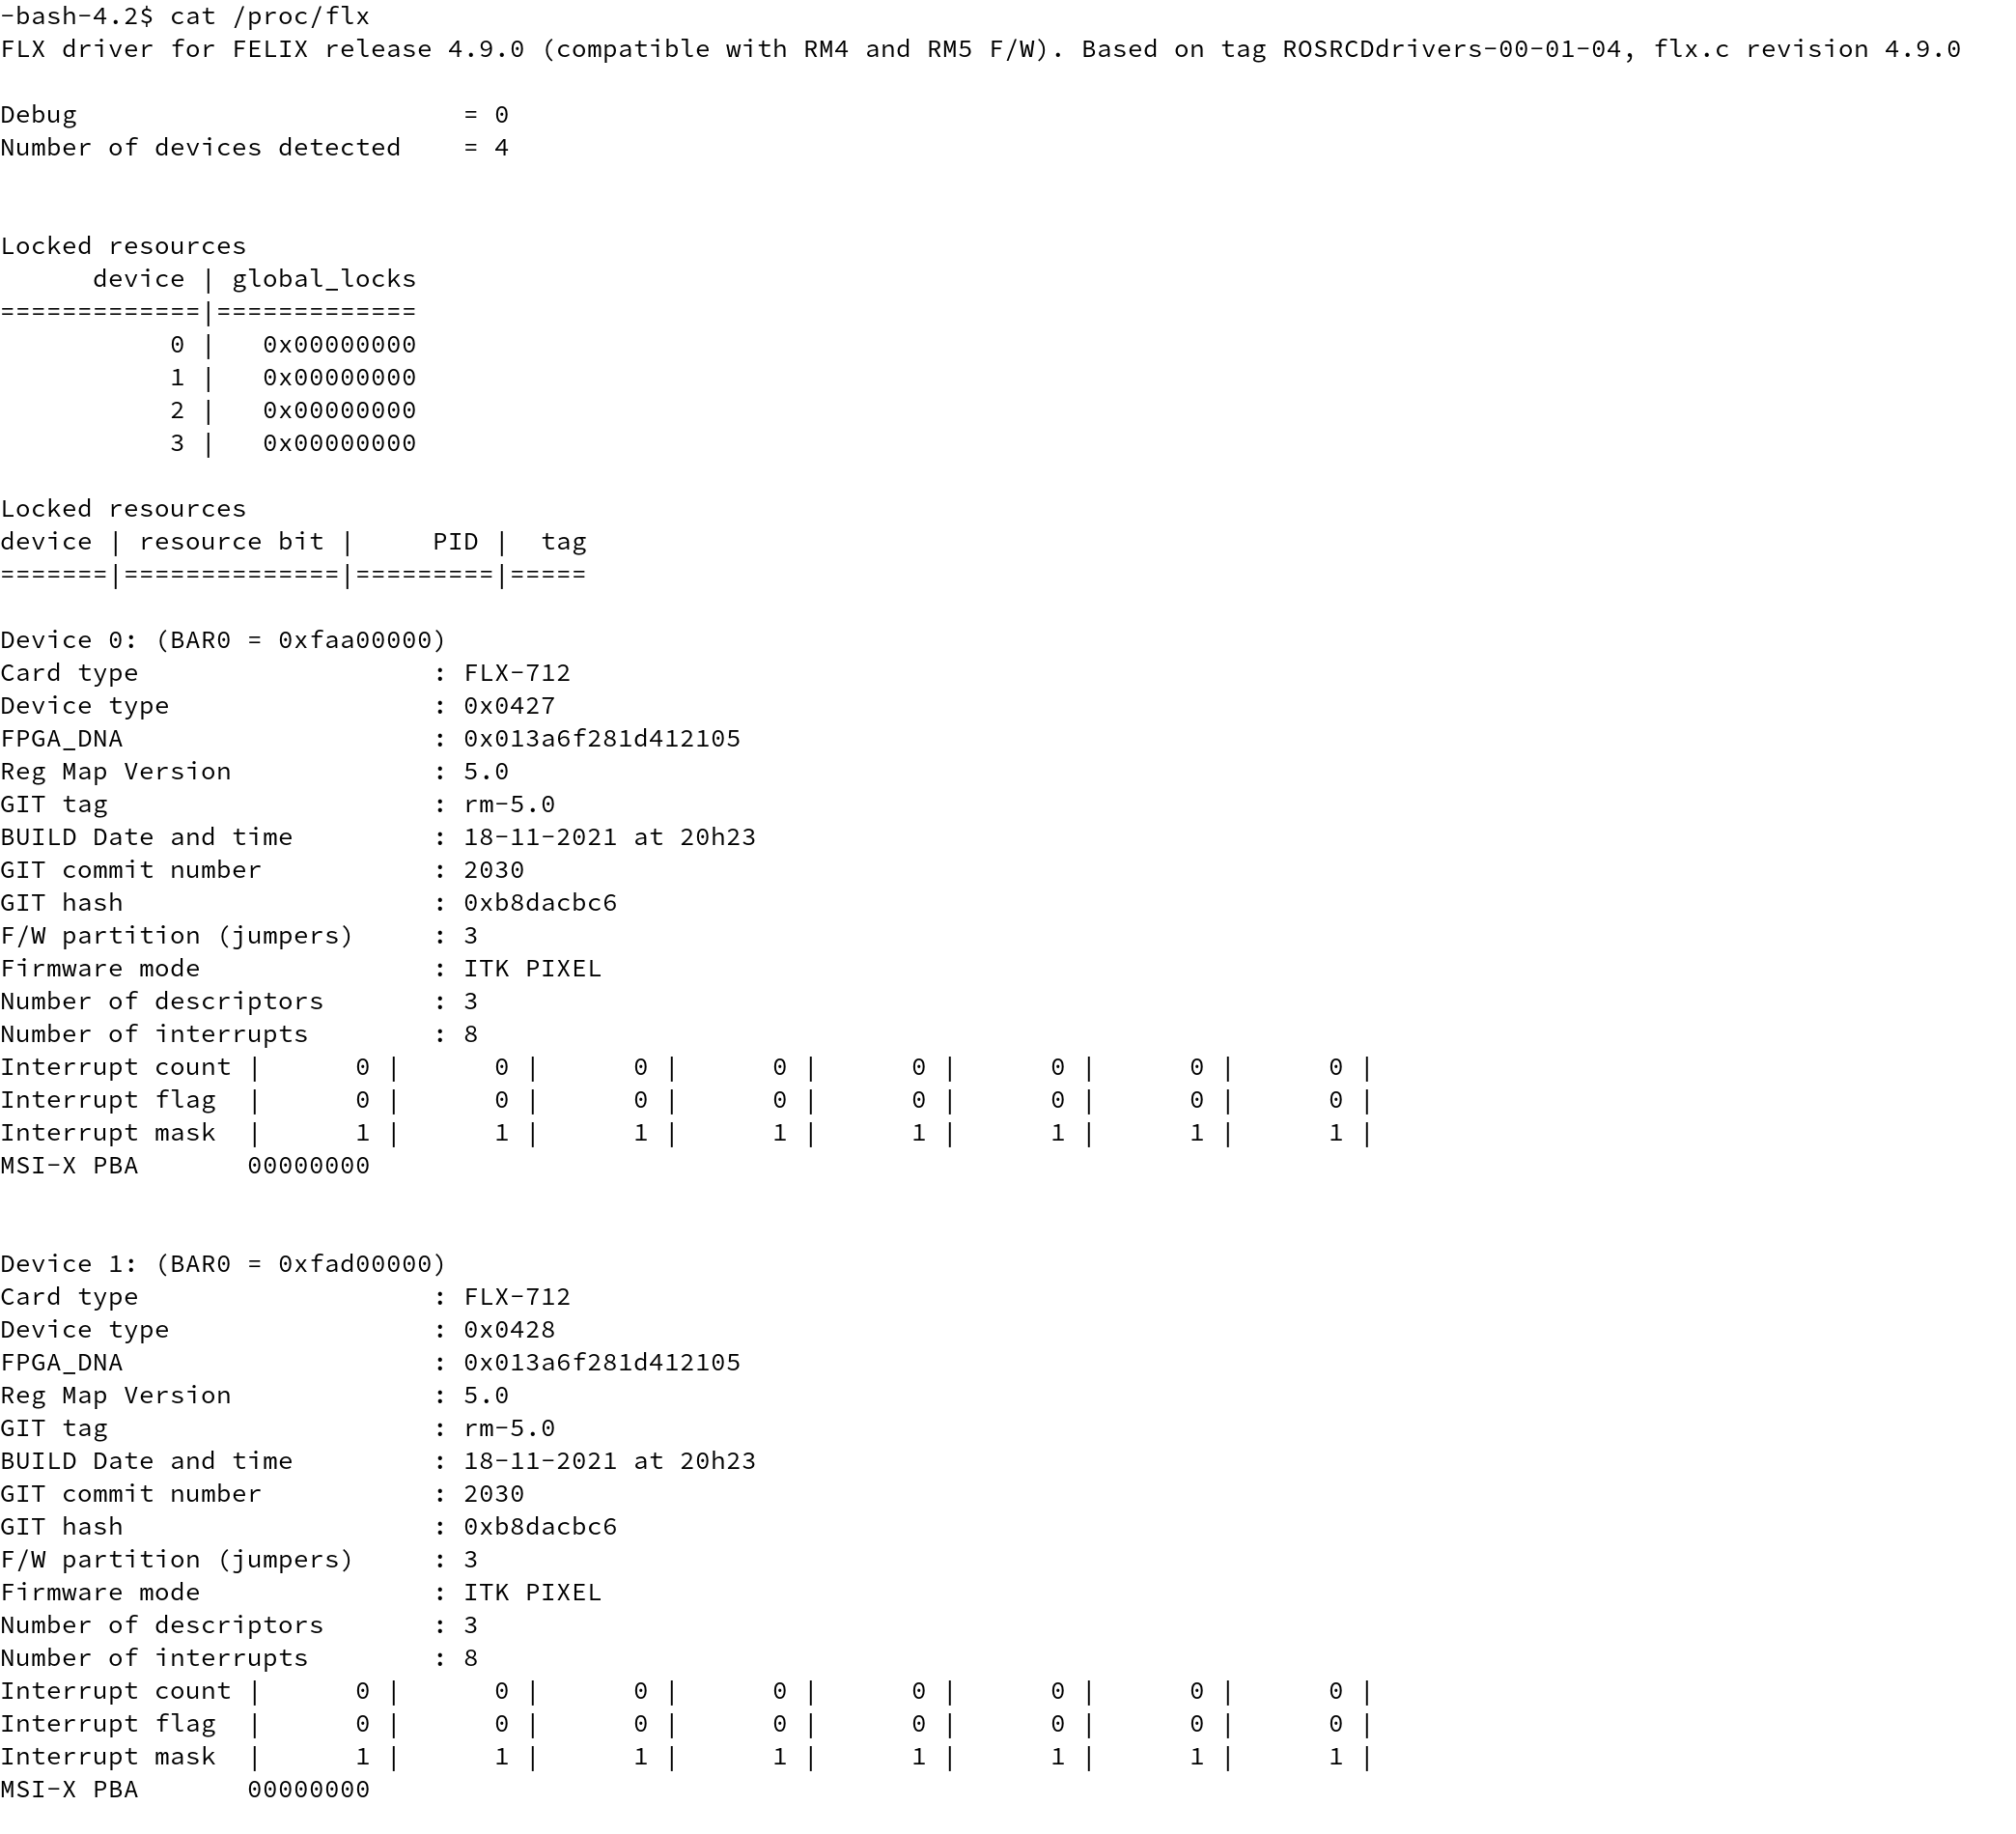
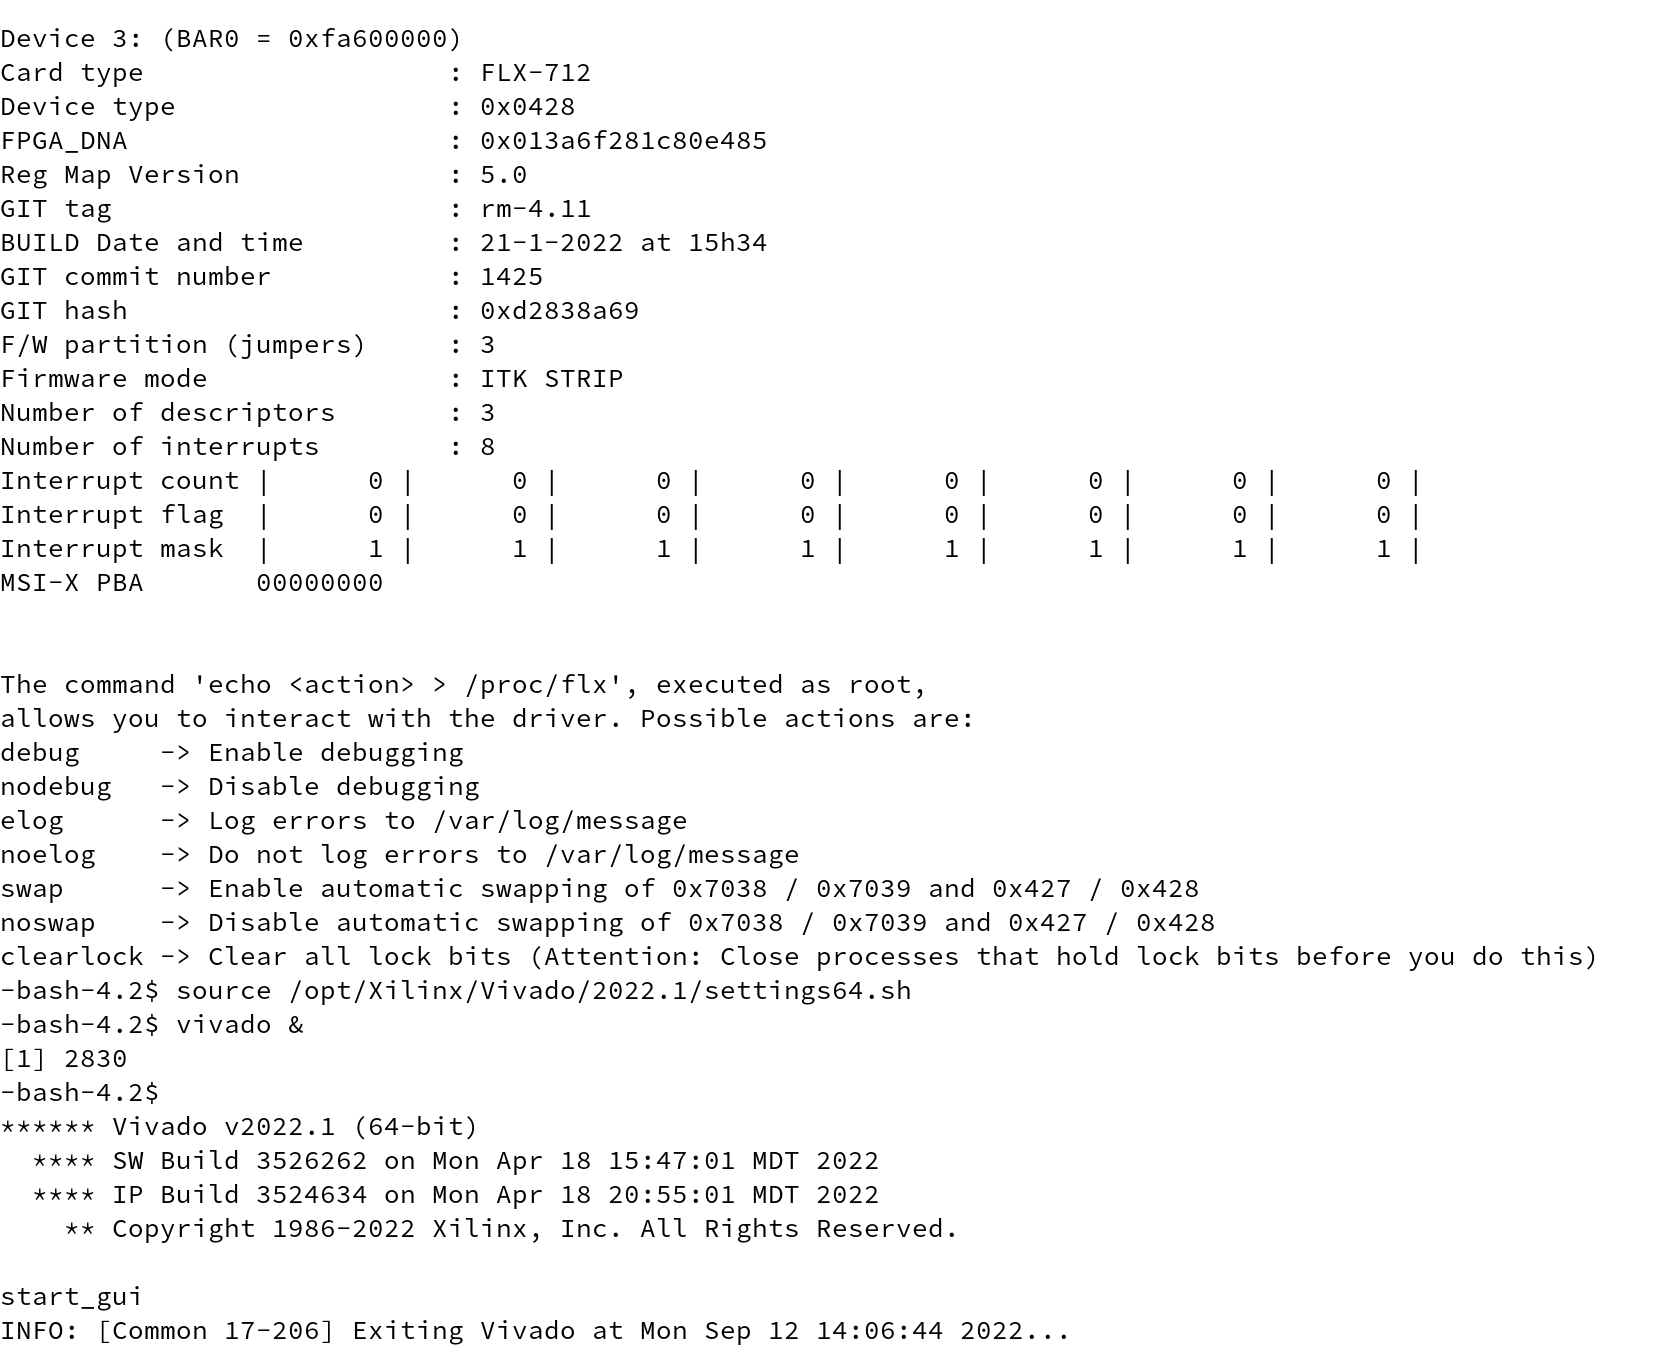
Once the driver is running, check the status of the cards by running the command: cat /proc/flx
If the system has detected the FELIX boards, the output should look something like this:
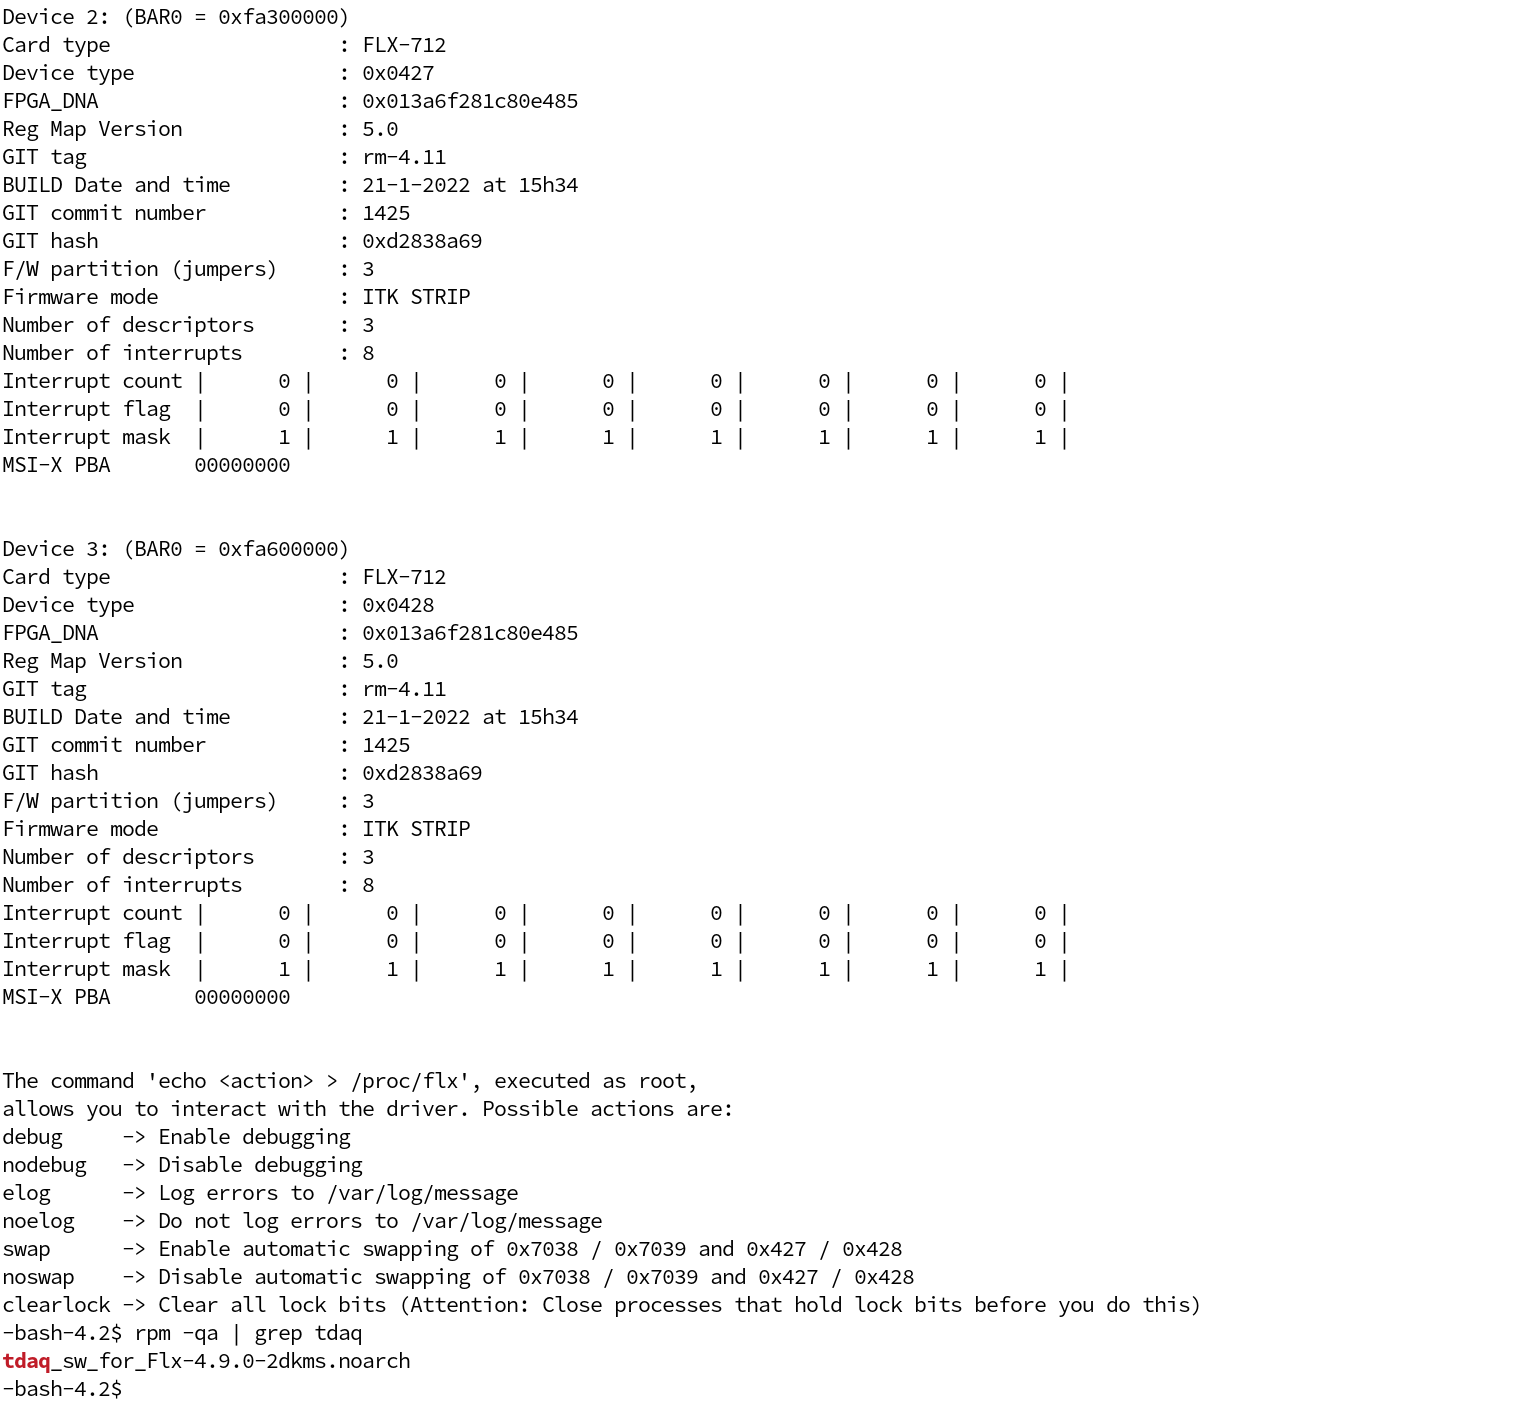
Note that we have another board in the same system for the ITk strip DAQ, hence can be seen in the output of "/proc/flx" command. The two devices with firmware as "GBT" are the ones for ITk pixel, indicating that they are not yet flashed with a firmware. This is the next step!
¶ FELIX firmware
For recommendations on the correct version of firmware and software, please look at the official ATLAS FELIX releases page - https://atlas-project-felix.web.cern.ch/atlas-project-felix/user/releases.html
The firmware we are currently using should be under "Phase-II rm 5.0" section. Please ensure look for the correct FELIX card version (e.g. FLX712), front-end (PIXEL), channel configuration (4CH) etc while downloading the tar file.
To untar the file, run tar -xvzf file.tar.gz
To upload the firmware:
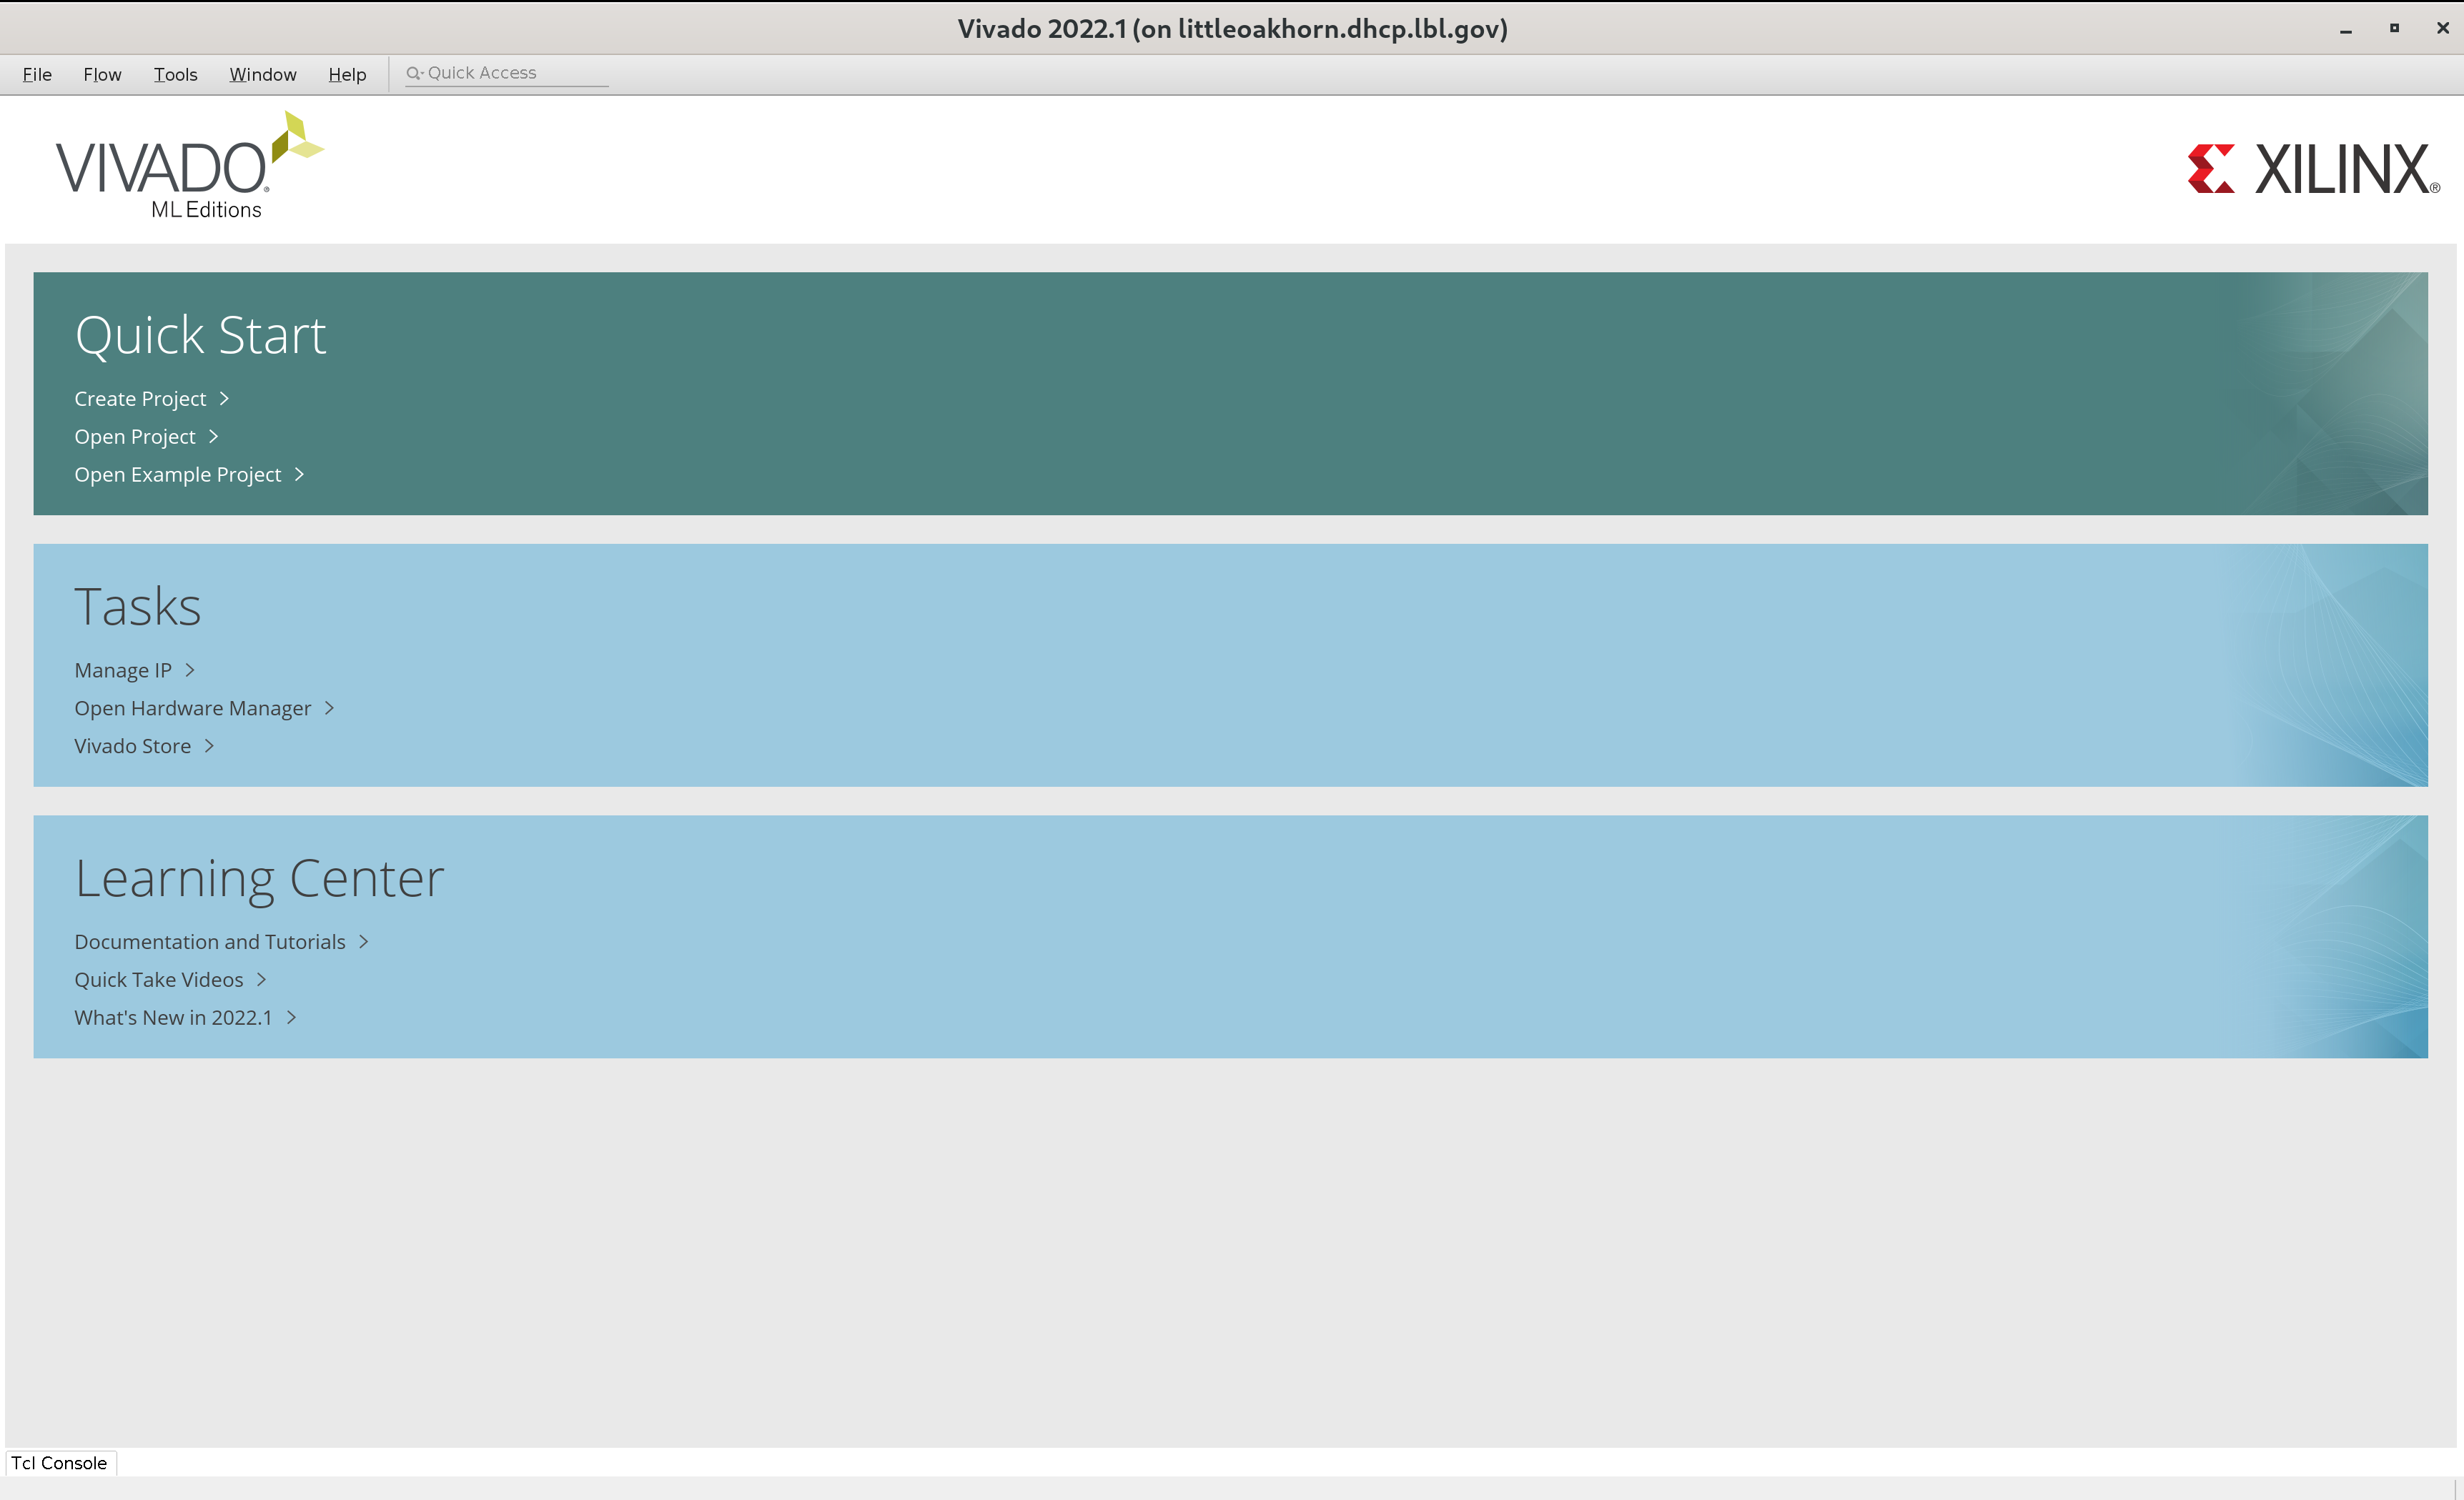
- Has to be done using Xilinx Vivado hardware manager. To open vivado, first source the software: source /opt/Xilinx/Vivado/2022.1/settings64.sh and then run vivado &. This will open a gui as shown in the image below.
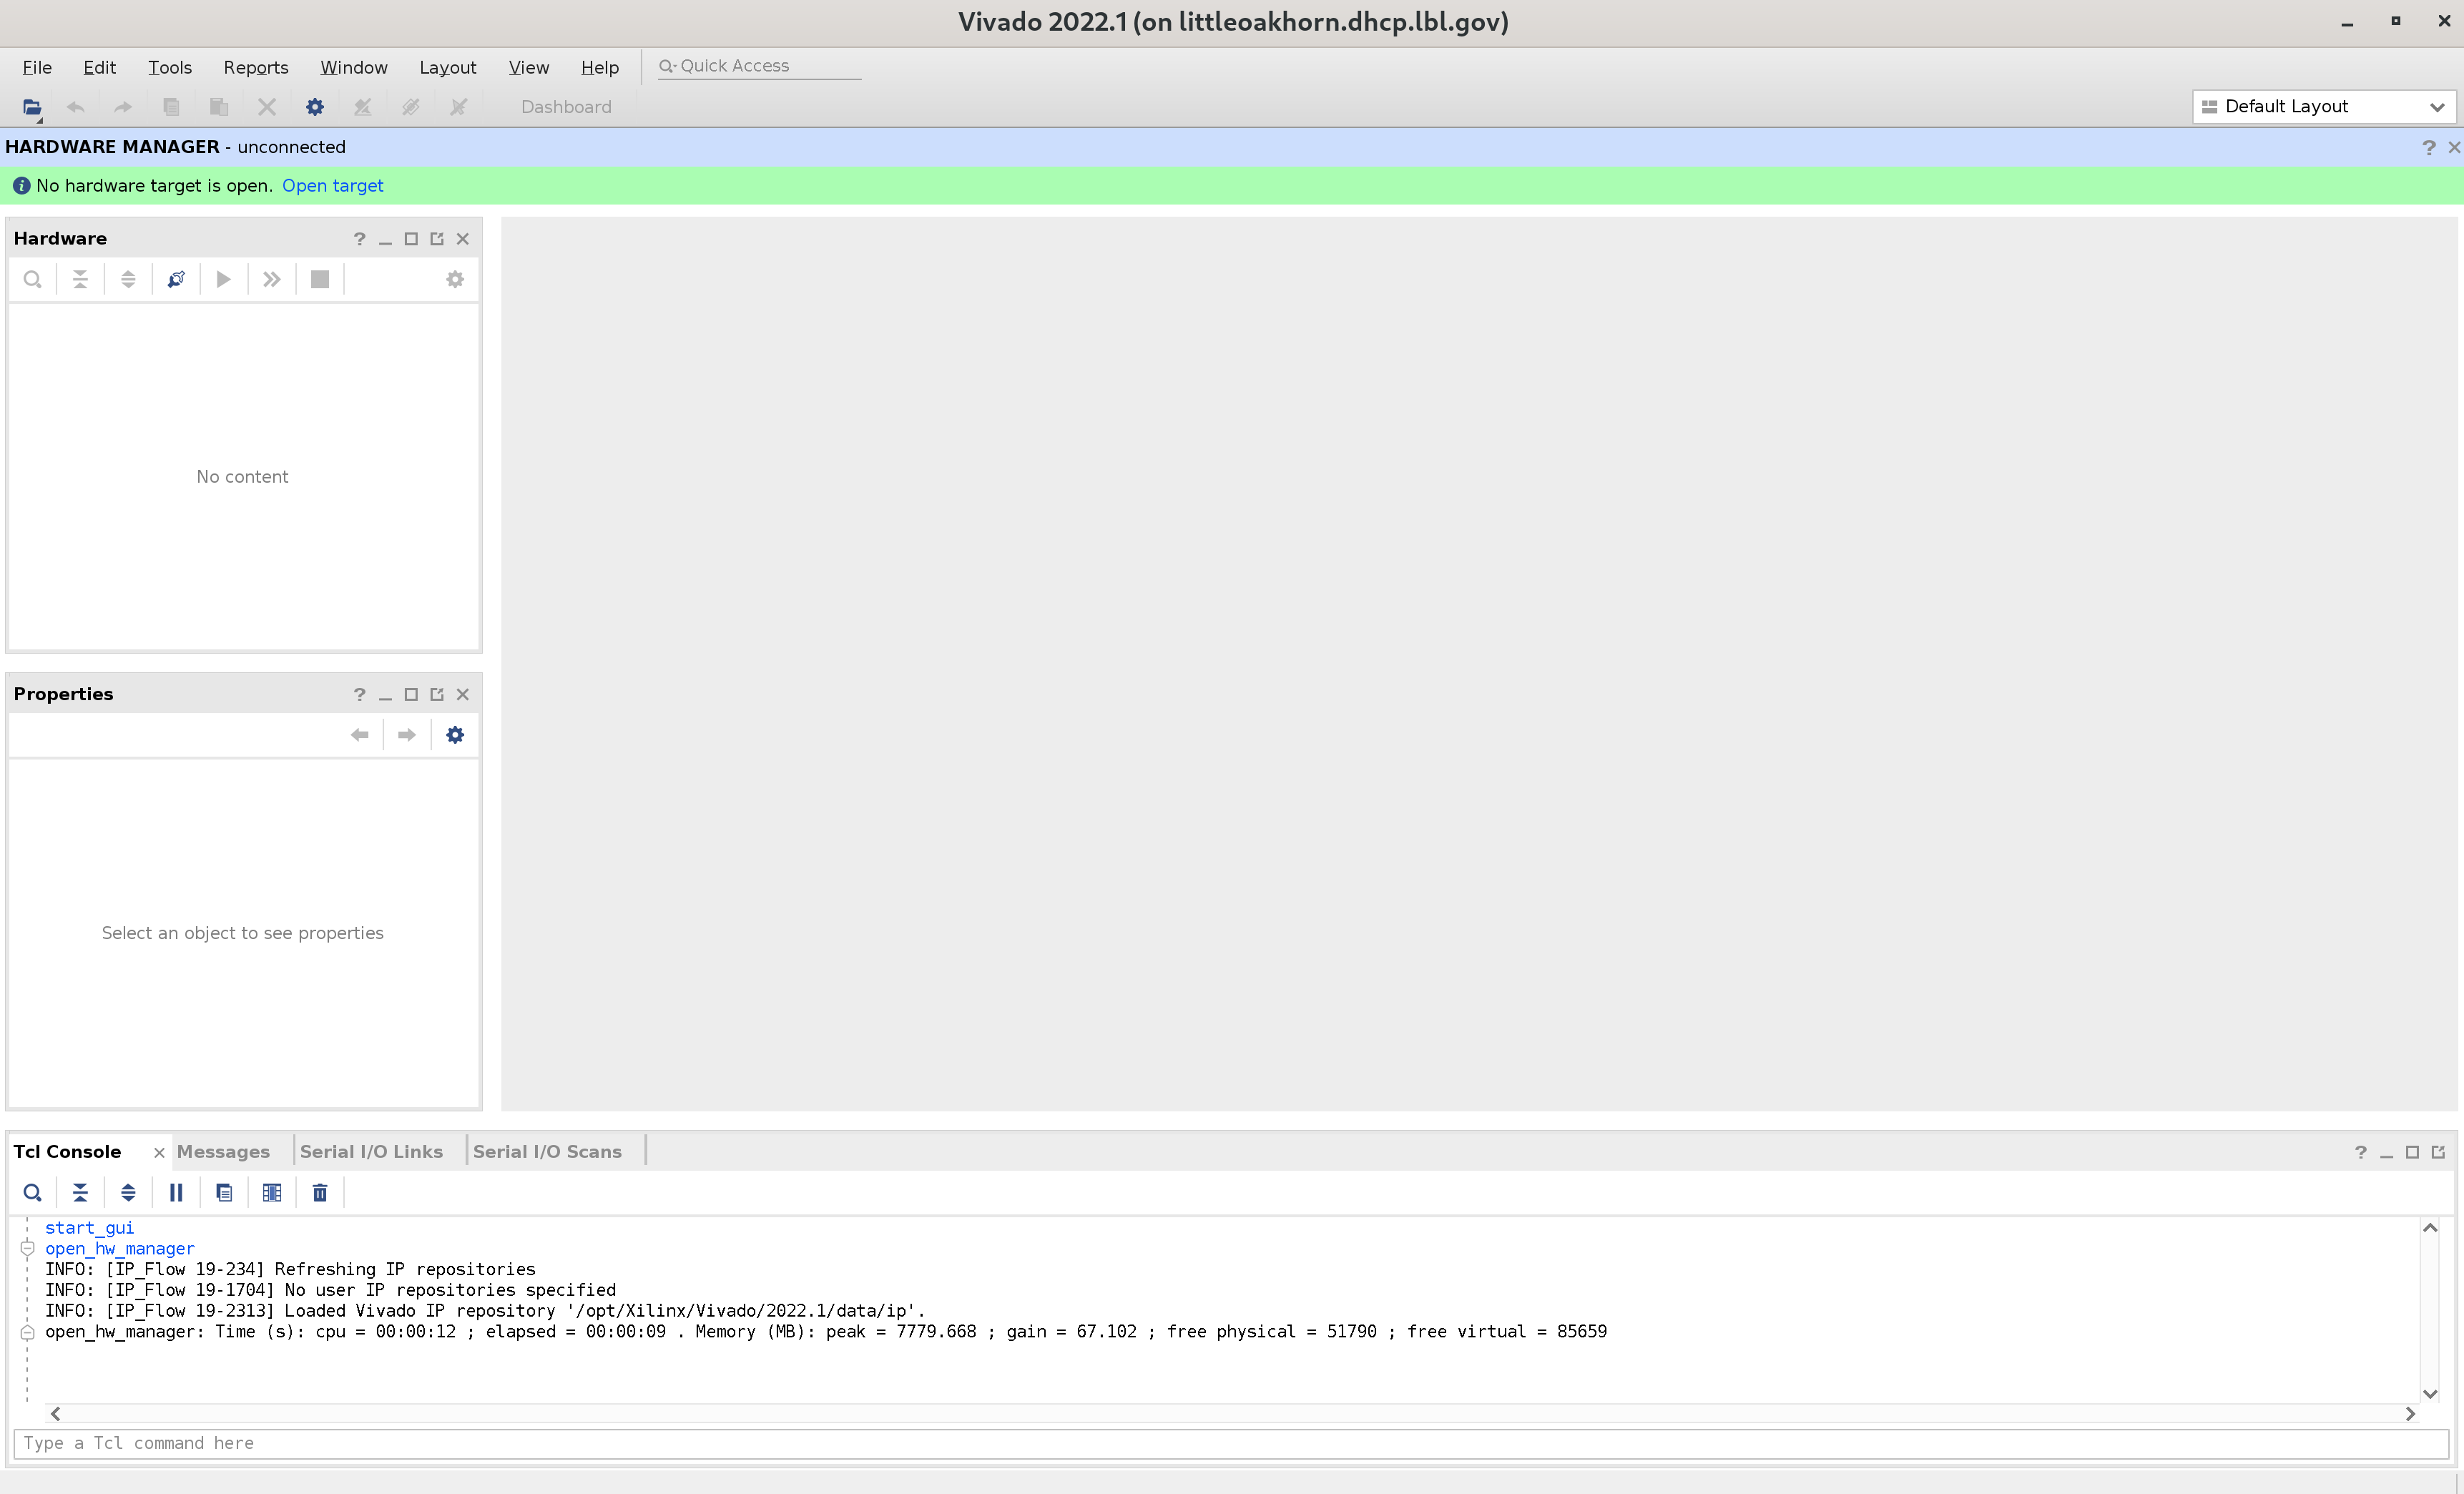
- Click on "Open Hardware Manager" and then click on "Open target" at the top left (as shown in the image below) to find your FELIX device. This will be the board which is connected to the system through JTAG programmer.
- Select your device from the left panel once found and right click to get the drop down menu (see image). From the menu, click on "program device" and upload the .bit firmware file from the unpacked tar file and proceed. This should be quick.

- Once the firmware is uploaded, program the flash memory as explained here - https://atlas-project-felix.web.cern.ch/atlas-project-felix/user/felix-user-manual/versions/4.0.6/4_firmware_programming.html#_4_2_4_programming_the_flash_rom_vc_709. This prevents the device to lose the programmed firmware even when it loses power.
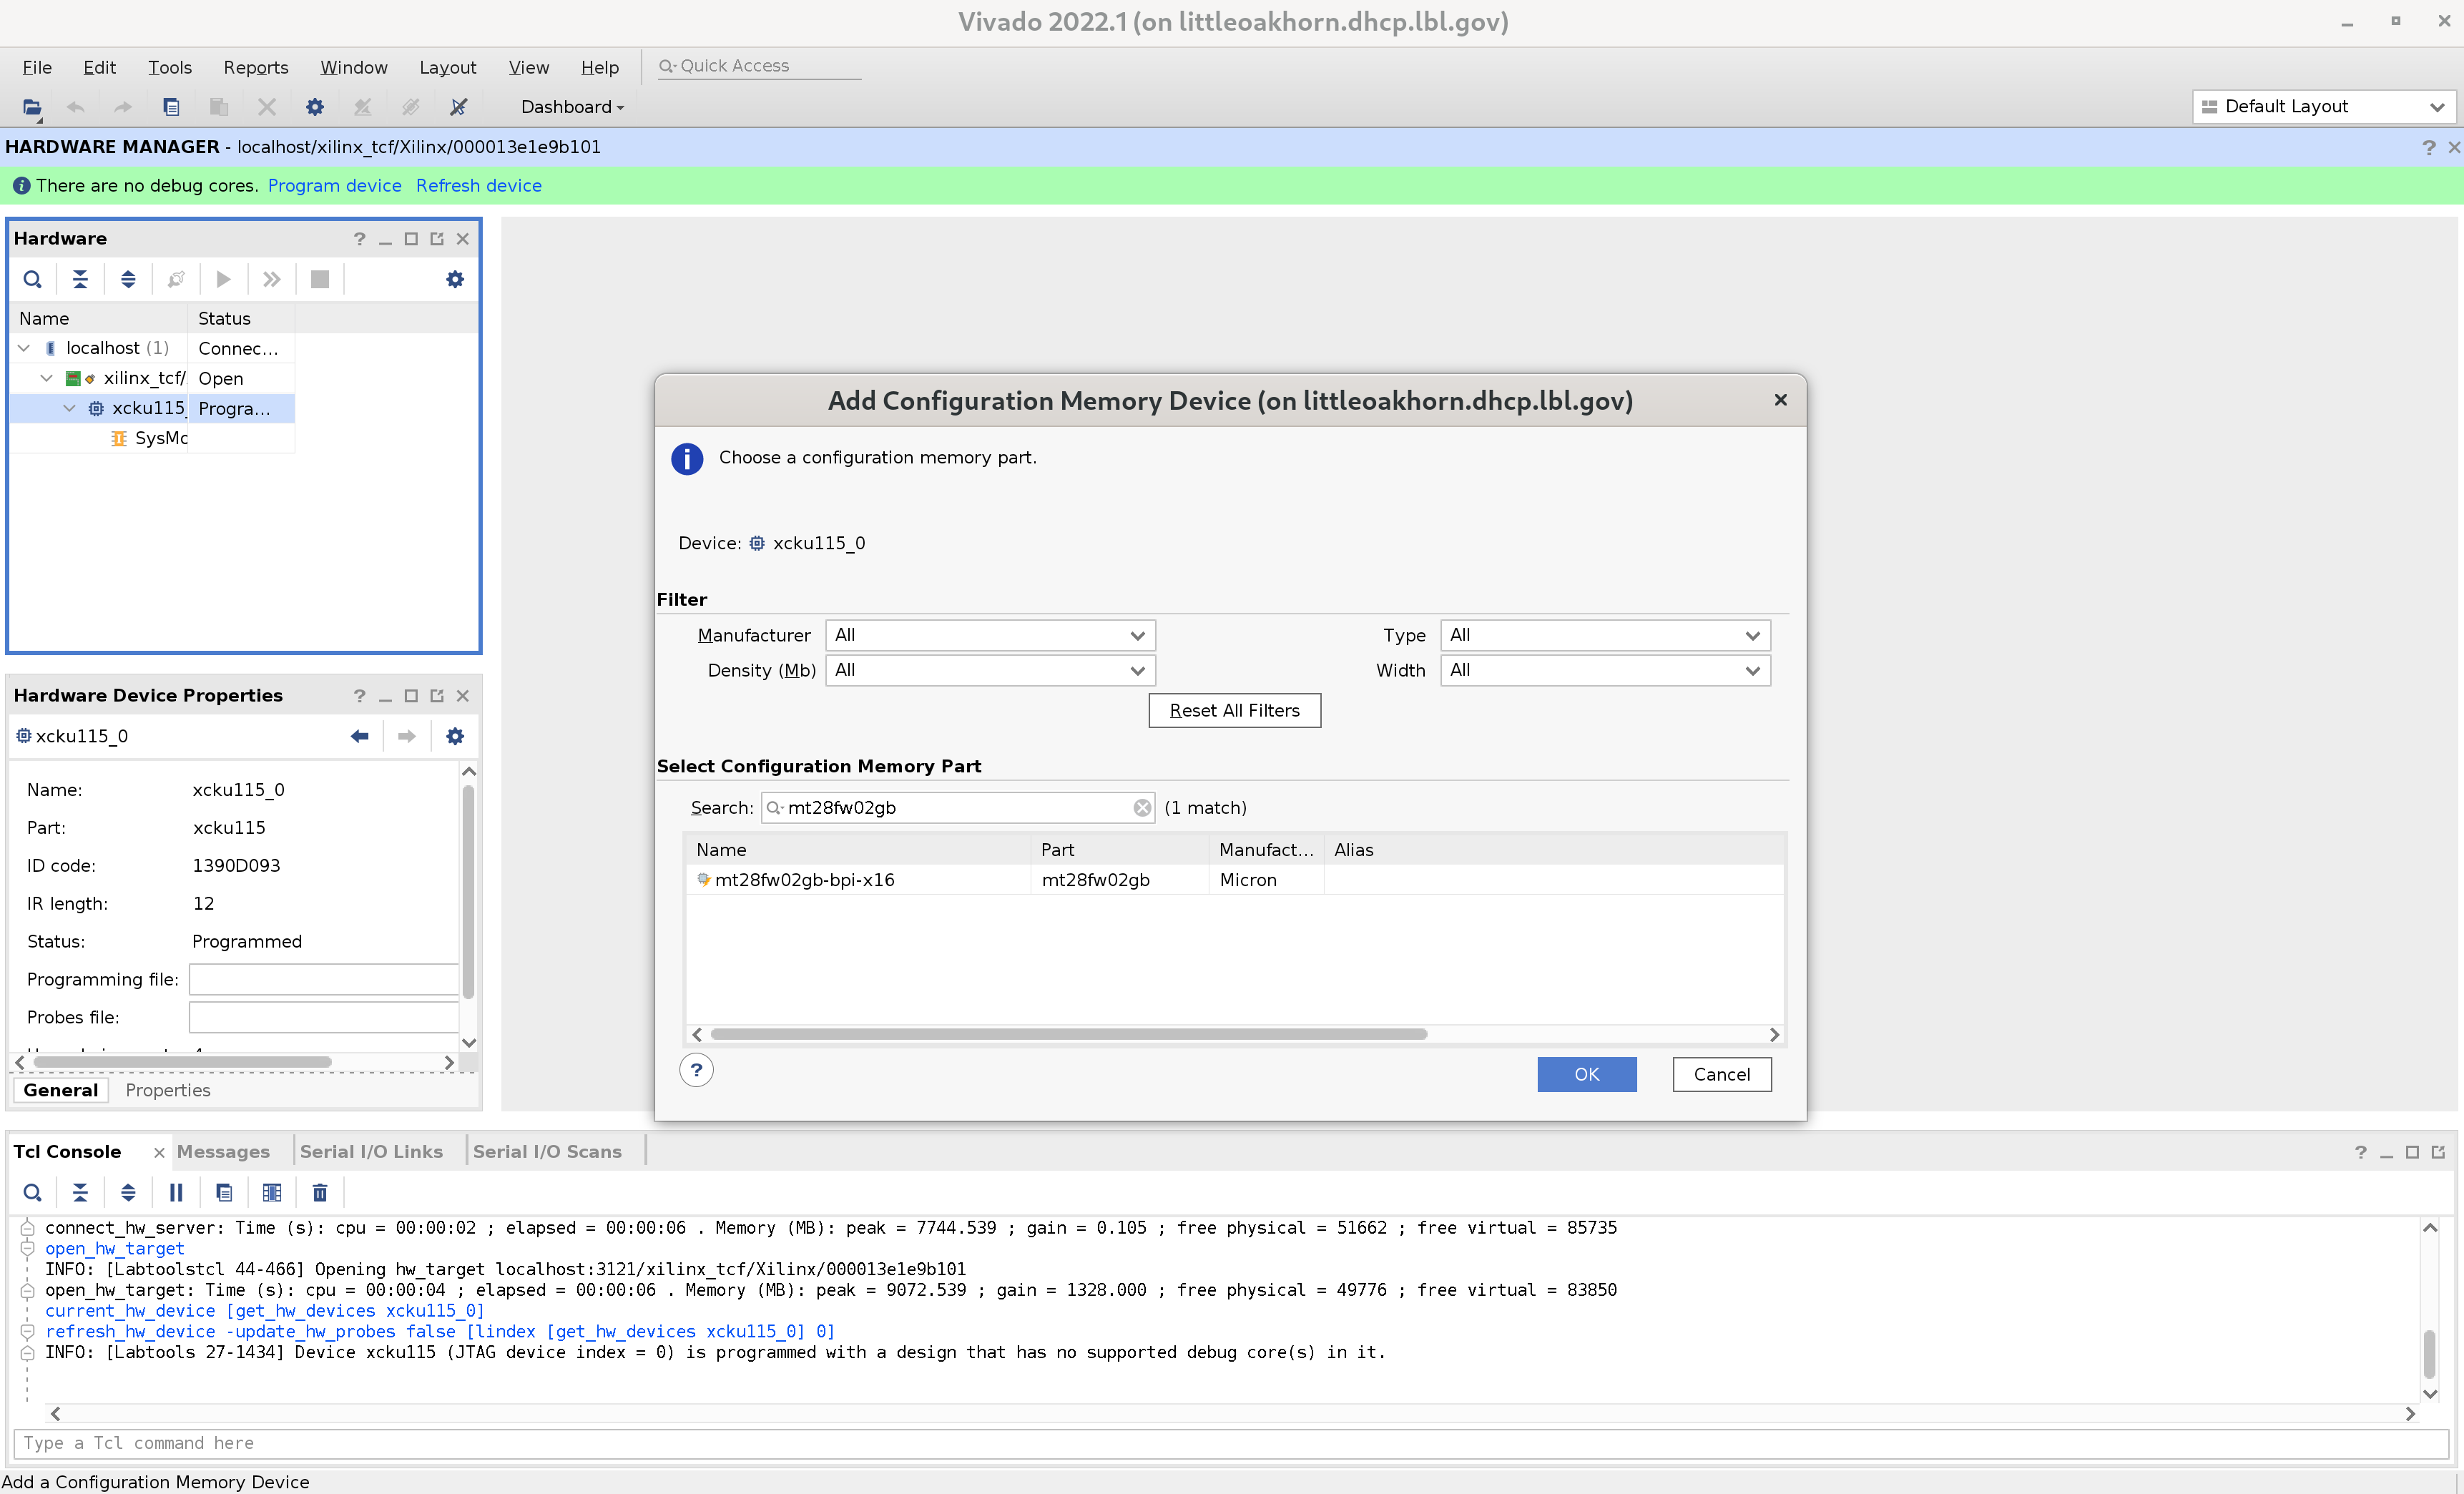
In short, from the same drop down menu, click on "Add configuration Memory Device" and select the memory device you want to program. For this case, the alias of the memory device is "mt28fw02gb", use this on the search bar (image below) and then click OK. After this, you need to upload the .mcs file from the same unpacked tar file to program the memory. This may take a few minutes. Note: for flashing the memory device, soft reboot doesn't work. You need to power cycle it fully. But then, you do not need to program FPGA anymore, it will use configuration from flash memory (hence doesn't lose in case of power failure).
Programming the FPGA only will work with soft reboot, but then will lose configuration in case of power disruption.
- Both the firmware and the memory are flashed now, all you need to do is to soft-reboot the system (just restart) without cutting the power to the FELIX board. Then, run 'cat /proc/flx' and you should see the device with your firmware ready. If it doesn't work, then you need to power cycle the board i.e. shut down the system entirely and restart. Once this works, the output of '/proc/flx' command should look like this (Note: compare it to the output above before flashing the firmware):
¶ FELIX software from felix-distribution package (recommended)
Please follow the instructions here - https://atlaswiki.lbl.gov/pixels/felixdaq/felixsw
¶ FELIX software (DEPRECATED - do not use)
There are two ways of installing FELIX software: compiling from scratch (recommended method) OR using pre-compiled package. Both the ways are laid out here:
- Using a precompiled version available centrally for use
- Download from the website (Doesn’t contain the FLX-1613 patch) https://atlas-project-felix.web.cern.ch/atlas-project-felix/user/dist/software/latest/
- You should download a reg 5.0 version which looks like: felix-05-00-xx-stand-alone-x86_64-centos7-gcc8-opt.tar.gz
- Untar the file and start using it (tar -xvzf).
Here, you do not have control over versions or bug fixes.
- Compiling from scratch (recommended)
Make sure "cvmfs" is installed on the machine. (If it's not, there are a few other things that you can try, refer to next subsection)
Download the Felix software following the instructions in the README at the git site: https://:@gitlab.cern.ch:8443/atlas-tdaq-felix/software.git
-
git clone --branch master https://gitlab.cern.ch/atlas-tdaq-felix/software.git
-
cd software
-
./clone_all.sh ssh (to clone all the packages, this will take some time)
-
./checkout_all.sh "Recommended_tag/branch_name" (master)
-
Minor patch to fix felixcore to get better timing. This won’t be needed in the future but is recommended:
cd felixcore
git checkout FLX-1613 -
cd .. (to "software")
run "source setup.sh" -
If the software is going to be used with regmap-5.0 firmware (Phase-II development) add the following environment variable:
export REGMAP_VERSION=0x0500
If the REGMAP_VERSION is not specified it defaults to 0x0400 (in use for Phase-I systems). -
Configure the build.
cd software
cmake_config x86_64-centos7-gcc8-opt
Note: CMake version >=3.4.3 and gcc version >=8 is required.
cd x86_64-centos7-gcc8-opt
makeMake sure all the dependencies for CentOS7 are installed in the system, otherwise "make" will fail.
https://gitlab.cern.ch/atlas-tdaq-felix/software#required-packages-for-centos7
¶ Installing and compiling the FELIX software without cvmfs (DEPRECATED - do not use)
There are a few different ways of achieving this.
i. If "cvmfs" is not present on the machine but you want to install the "cvmfs" package itself:
Follow the instructions from any of these links -
https://cvmfs.readthedocs.io/en/stable/cpt-quickstart.html#getting-the-software
https://gitlab.cern.ch/atlas-tdaq-felix/software/blob/master/README.md#use-cvmfs-directly-from-cerns
Once cvmfs is setup, you can proceed normally in the steps above.
ii. Use "cvmfs" from CORI
One can use "cvmfs" on CORI but with a different shifter image required for compatibility with TDAQ software in CentOS7.
To load the TDAQ shifter image and mount /cvmfs (to use cmake): shifter --image=gitlab-registry.cern.ch/atlas-tdaq-software/tdaq_ci:centos7 --module=cvmfs -- /bin/bash
Without the “--module=cvmfs” option, cvmfs will not be mounted in the shifter environment.
After this, proceed normally as above. Once the "make" command is completed, copy the entire "software" directory to the lab machine (without cvmfs) and start using it.
In future, if any change needs to be done any of the package, for ex git update or a new patch fo r any module, do it on the original setup on CORI, compile it again and copy back to the lab machine. So, this way we have more control over the package as opposed to the precompiled binary from git.
iii. Partial use of CORI and the lab machine, more complicated (not tested fully)
If cmake, gcc,etc. packages are independently available on the lab machine, independently of cvmfs/sft.cern.ch LCG utilities and you still want to have some handle over compilation of the package on the lab machine (without cvmfs) itself, then in principle the paths to cmake, gcc etc. can be set accordingly in the "setup.sh" file.
However, you still need to get TDAQ osftware from cvmfs location and that can be done on CORI again. The steps below are not to be fully trusted... if it works, then great!
- Login to cori
-	Load the TDAQ shifter image and mount /cvmfs (to use cmake):
	shifter --image=gitlab-registry.cern.ch/atlas-tdaq-software/tdaq_ci:centos7 --module=cvmfs -- /bin/bash
	Without the “--module=cvmfs” option, cvmfs will not be mounted in the shifter environment.
-	Set up path to cmake (version >=3.16 required to compile TDAQ software):
	alias cmake=/cvmfs/sft.cern.ch/lcg/contrib/CMake/3.17.1/Linux-x86_64/bin/cmake OR
	export PATH=/cvmfs/sft.cern.ch/lcg/contrib/CMake/3.17.1/Linux-x86_64/bin/: ${PATH}
	Run “cmake –version” to test if it has worked. Now you should be able to run cmake.
- Next, source gcc path (version >=8 required):
	source /cvmfs/sft.cern.ch/lcg/contrib/gcc/11/x86_64-centos7-gcc8-opt/setup.sh
- Next, clone the TDAQ and TDAQ-common packages: following steps from https://gitlab.cern.ch/atlas-tdaq-software/tdaq-cmake/-/blob/tdaq-99-00-00/doc/BUILDING.md#manual-build
- mkdir -p tdaq tdaq-common
- git clone https://gitlab.cern.ch/atlas-tdaq-software/tdaq-common-cmake.git tdaq-common/tdaq-common-99-00-00
	(cd tdaq-common/tdaq-common-99-00-00; git submodule update -i)
- git clone https://gitlab.cern.ch/atlas-tdaq-software/tdaq-cmake.git tdaq/tdaq-99-00-00
	(cd tdaq/tdaq-99-00-00; git submodule update -i)

-	Now, to compile them:
	i. export CMAKE_PREFIX_PATH=/path/to/tdaq-common/tdaq-common-99-00-00/cmake_tdaq/cmake
	ii. mkdir -p build/tdaq-common
	iii. cd build/tdaq-common
	iv. cmake -D BINARY_TAG=x86_64-centos7-gcc11-opt ../../tdaq-common/tdaq-common-99-00-00  (Note: gcc version in BINARY_TAG should match the compiler version that is set up)
	v. make
	Fix the errors as they appear.. For ex, if the OS architecture is not created automatically then change it in the .cmake files manually. A higher version of cmake than “3.19” is required to compile tdaq. Setup ‘alias cmake’ again. Also, a few more paths may need to be exported:
	export CMAKE_PREFIX_PATH=/global/homes/a/arastogi/TDAQ_FELIX_Oct2022/build/tdaq-common/
	export TDAQ_DIR=/global/homes/a/arastogi/TDAQ_FELIX_Oct2022/tdaq-common/tdaq-common-99-00-00/cmake_tdaq/cmake/
	vi. mkdir -p build/tdaq
	vii. cd build/tdaq
	viii. cmake -D BINARY_TAG=x86_64-centos7-gcc11-opt ../../tdaq/tdaq-99-00-00  (Note: gcc version in BINARY_TAG should match the compiler version that is set up)
	ix. make
	Fix the errors as they appear.. For ex, setting the paths as above.

- If everything goes well, the binaries should be created that you can transfer to the lab machine (without cvmfs/atlas.cern.ch) and then point to this path for TDAQ software in the "setup.sh".
Now that everything is available on the lab machine,it should compile normally and then work as expected.