¶ Quick start
A simplified DAQ chain with FELIX and YARR is shown below.

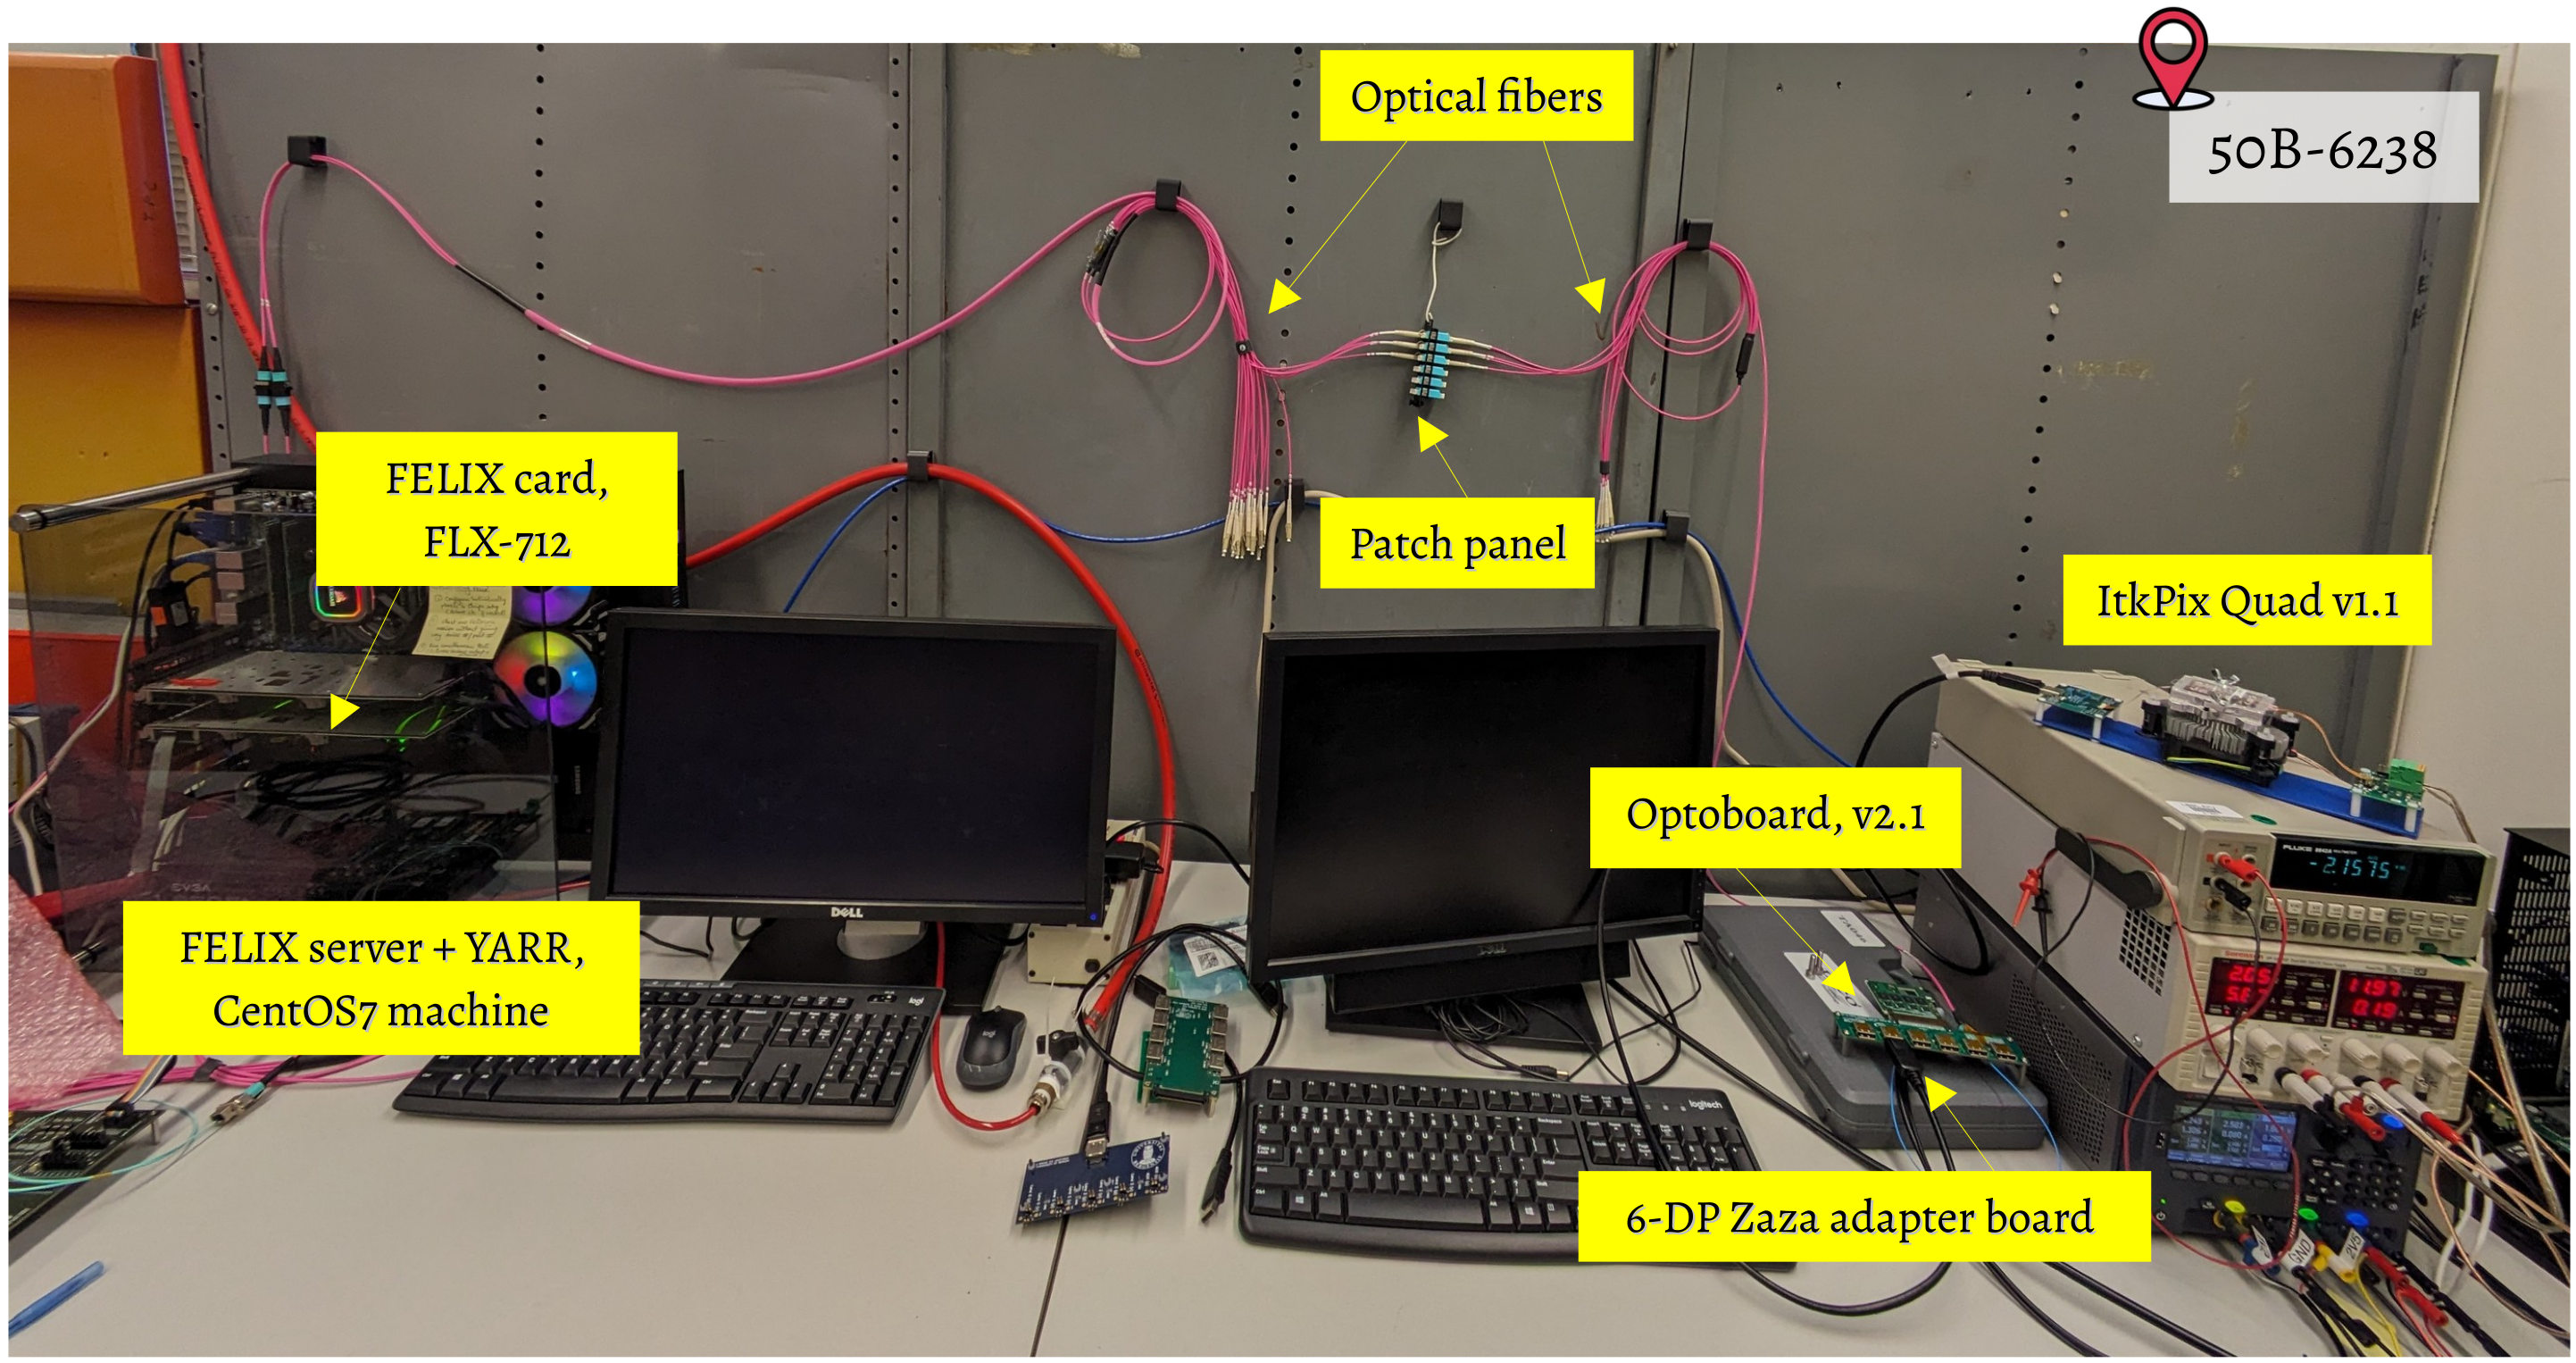
Note: PC1 = PC2 in our current test stand at LBNL (see image of the setup at the end of the page).
On this page, you will find instructions on how to setup all the necessary prerequisites related to YARR, FELIX and optoboard. Furthermore, you will also find instructions on configuring the individual components, in order to run a test on the DAQ chain.
¶ Current status
There are two servers for running DAQ with FELIX board. These are Felixcore (old, will not be supported for testing at LLS sites in future) and Felix-star (new recommendation for Stage-I and Stage-II). The Felixcore version is currently more stable than Felix-star when running with YARR SW on pixel v1.1 chip or module. Hence, for first time setups and to get started quickly, running Felixcore is recommended.
However, for FELIX firmware versions greater than 5.3, it is recommended to use Felix-star. Check the FELIX firmware version by running the following command:
cat /proc/flx
Latest status of the ITkPixel DAQ with YARR software and Felixcore can be found in the presentation from ITkWeek in Sep 2023 here.
For latest status of YARR with Felix-star, you can refer to these slides from ITk week in March 2024.
Some other reading material can be found here.
¶ Running ITkPixel v1.1 SCC with YARR and Felixcore (Last updated on Mar 25, 2024)
-
For instructions on setting up the FELIX software, firmware and driver, please look at section Installing FELIX software, firmware and driver. And then, Configure FELIX and Configure Optoboard.
-
Setup Felixcore session in the new felix-distribution software. In a new terminal session, run:
cd <Felix-distribution>
export REGMAP_VERSION=0x0500
source setup.sh
./x86_64-centos7-gcc11-opt/felixcore/felixcore -d 0 --data-interface lo -v -p 12350 -r 12340 -P 12330 -w 8080
¶ Setting up YARR
YARR LATEST release is v1.5.1
Calibration scans with FW-based trigger generation works, using YARR tag v1.4.4 or higher, for trigger frequency >=5 KHz and number of injections < 128. Injection-less scans such as noise and source scans are limited by the current firmware capabilities. But the infrastructure to run these scans is in place.
Calibration scans with SW-based trigger generation works, using YARR tag v1.4.5 or higher. Tested for trigger frequencies in the range 100 Hz – 5 Khz. No constraint on number of injections. Injection-less scans such as the noise and source scans should also run nominally.
To setup YARR latest release tag v1.5.1, please follow the steps below:
git clone https://gitlab.cern.ch/YARR/YARR.git Yarr
cd Yarr
git checkout tags/v1.5.1 -b v1.5.1
source scl_source enable devtoolset-9
cmake3 -S . -B build_devel -DYARR_CONTROLLERS_TO_BUILD="Spec;NetioHW" -DYARR_FRONT_ENDS_TO_BUILD="Rd53b"
cmake3 --build build_devel -j32
cmake3 --install build_devel
Please follow the YARR gitlab repository here for news on latest releases and other requirements.
¶ Running YARR scans with felixcore
To run a YARR calibration scan with FW-based trigger generation, pixFwTrigger should be set to true in the controller config here. And then make sure to configure FELIX registers for the appropriate scan by running the script config_caltrigseq.sh.
For running calibration scans with SW-based trigger, just set the pixFwTrigger to false (default setting).
On a different terminal (with felixcore session already running):
cd Yarr
bin/scanConsole -l configs/logging/default_and_trace_front_end.json -c configs/connectivity/example_rd53b_setup.json -r configs/controller/felix_netio_pixels.json
This will generate a default chip configuration called rd53b_test.json in the directory configs/. Please make sure to use correct rx and tx channels in the chip connectivity file configs/connectivity/example_rd53b_setup.json. Now, we have to make a few adjustments in the rd53b_test.json to enable running scan with YARR, mainly to set the correct data rate and disable register read and chip name check. Follow the instructions here - Configure ITkPixel v1.1 SCC.
Finally, we can run YARR scans (e.g. a digital scan) using the command below:
cd Yarr
bin/scanConsole -l configs/logging/default_and_trace_front_end.json -c configs/connectivity/example_rd53b_setup.json -r configs/controller/felix_netio_pixels.json -s configs/scans/rd53b/std_digitalscan.json -p
¶ Running ITkPixel v1.1 with YARR and Felix-star (new server) - Last updated on Mar 25, 2024
Before starting, please make sure to have the appropriate FELIX software, firmware and driver installed, please look at section Installing FELIX software, firmware and driver for instructions. And then, Configure FELIX and Configure Optoboard.
The Felix-star is a culmination of three different processes:
- felix-tohost: to bring readout data
- felix-toflx: to send commands from client applications (e.g. YARR)
- felix-register: to set the FELIX registers dynamically, to monitor FPGA properties etc.
We need to launch all three above programs concurrently, on separate terminals. But firstly, we need to create bus directory (just once). This will contain the list of all active elinks, both rx and tx, to be shared with felix-client interface with the proper netio configuration, where felix-client is an API for client applications e.g. YARR. While this directory can be created anywhere, we recommend to do it in the /tmp area.
cd /tmp
mkdir bus
Optional: If you want, you can also create a FIFO for dumping felix-star statistics, mostly for debugging purposes:
cd /tmp/bus
mkfifo stats
Otherwise, skip this step and omit the option --stats-out from the felix-star commands below.
There are two modes in which we can run DAQ with Felix-star: RDMA (with Mellanox card installed) or using ethernet interface of motherboard on local host (TCP/IP). The way to start felix-star processes, setup controller configuration for YARR and YARR branch to use currently are different for these two modes, so please follow the instructions below carefully depending on your use case.
¶ Running on local host with ethernet interface in TCP/IP protocol
If you run ifconfig on your linux machine, you should see an interface called eno1 which is the ethernet port:
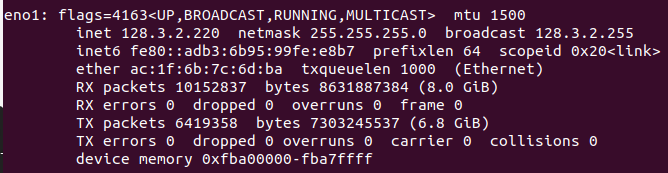
This is the recommended interface from TDAQ when not using the Mellanox card.
If you do not have an active ethernet interface, then you can use the loopback mode, but be careful that it may have setup-dependent strange behavior.
Open three individual terminals and setup the felix SW environment. Then, if using the eno1 interface, get the correct ip address from the ifconfig output. Finally, run the following three processes, one per terminal:
cd <Felix-distribution>
export REGMAP_VERSION=0x0500
source setup.sh
felix-tohost -d 0 --free-cmem --bus-dir /tmp/bus --bus-groupname FELIX --did 0x00 --cid 0x0000 --ip 128.3.2.220 -v --stats-out /tmp/bus/stats
This starts the felix-tohost process in buffered mode.
cd <Felix-distribution>
export REGMAP_VERSION=0x0500
source setup.sh
felix-toflx -d 0 --free-cmem --bus-dir /tmp/bus --bus-groupname FELIX --did 0x00 --cid 0x0000 --ip 128.3.2.220 -v --stats-out /tmp/bus/stats
This starts the felix-toflx process in buffered mode.
cd <Felix-distribution>
export REGMAP_VERSION=0x0500
source setup.sh
felix-register --bus-dir /tmp/bus --bus-groupname FELIX 128.3.2.220 0 0x00 0x0000 1 0x00 0x0001
This starts the felix-register process.
If, on the other hand, using the loopback mode, replace --ip 128.3.2.220 with --ip localhost in the felix-toflx and felix-tohost commands, while replacing 128.3.2.220 with lo in felix-register command.
¶ Running on Mellanox interface for RDMA
Mellanox card - https://www.fs.com/au/products/119649.html
To install and setup Mellanox card, follow instructions in sec 3.3.1 and 3.3.2 of FELIX manual.
Essentially, installing the NVIDIA MLNX_OFED drivers for the correct kernel version and OS. And then, assigning static IPs to the two ports.
Important: If running YARR and Felix server on the same PC, then you have to self-connect the two ports of the Mellanox card to enable loopback.
Once Mellanox card is configured, run ifconfig command to check the two port names, one of which will be used for felix-star (e.g. enp2s0f0 here) and the other one will be used by felix-client (e.g. enp2s0f1 here).
Again, open three individual terminals and setup the felix SW environment. Then, run the following three processes, one per terminal:
cd <Felix-distribution>
export REGMAP_VERSION=0x0500
source setup.sh
felix-tohost -d 0 --free-cmem --bus-dir /tmp/bus --bus-groupname FELIX --did 0x00 --cid 0x0000 --iface enp2s0f0 -v --stats-out /tmp/bus/stats
This starts the felix-tohost process in buffered mode.
cd <Felix-distribution>
export REGMAP_VERSION=0x0500
source setup.sh
felix-toflx -d 0 --unbuffered --free-cmem --bus-dir /tmp/bus --bus-groupname FELIX --did 0x00 --cid 0x0000 --iface enp2s0f0 -v --stats-out /tmp/bus/stats
This starts the felix-toflx process in unbuffered mode.
cd <Felix-distribution>
export REGMAP_VERSION=0x0500
source setup.sh
felix-register --bus-dir /tmp/bus --bus-groupname FELIX enp2s0f0 0 0x00 0x0000 1 0x00 0x0001
This starts the felix-register process.
¶ Setting up YARR
YARR LATEST release is v1.5.1
The latest YARR release supports running felix-star without Mellanox network card interface, which is the current Stage-I recommendations.
To install and compile YARR, for e.g. with branch for no RDMA setup (on CentOS7 machine):
cd <Felix-distribution>
export REGMAP_VERSION=0x0500
source setup.sh (#Important to use the GCC version from the same LCG release)
cd ..
git clone https://gitlab.cern.ch/YARR/YARR.git Yarr
cd Yarr
git checkout tags/v1.5.1 -b v1.5.1
cmake3 -S . -B build_FelixClient -DYARR_CONTROLLERS_TO_BUILD="Spec;FelixClient" -DYARR_FRONT_ENDS_TO_BUILD="Rd53b"
cmake3 --build build_FelixClient -j32
cmake3 --install build_FelixClient
To install and compile YARR, for e.g. with branch for no RDMA setup (on ALMA9 machine):
git clone https://gitlab.cern.ch/YARR/YARR.git Yarr
cd Yarr
git checkout tags/v1.5.1 -b v1.5.1
cmake3 -S . -B build_FelixClient -DYARR_CONTROLLERS_TO_BUILD="Spec;FelixClient" -DYARR_FRONT_ENDS_TO_BUILD="Rd53b"
cmake3 --build build_FelixClient -j32
cmake3 --install build_FelixClient
In the controller config, change the localIPorInterface to the interface name of the Mellanox card (enp2s0f1) to use RDMA. If you do not have Mellanox card installed currently, use the ethernet interface eno1 (recommended) on the localhot, by setting localIPorInterface = eno1. Default value is lo to use loopback on localhost.
Also, the busDir to the path of the bus folder created in the /tmp directory. This is where all the active elinks (for uplink and downlink) are published for felix-client thread.
For running YARR scans with felix-star in the RDMA mode i.e. with the Mellanox network card, there is an open merge request, but under development, here: MR!704
¶ Running YARR scans with felix-star
First, make sure felix-star processes are running. Then, in a new terminal again set the FELIX environment first, followed by YARR scanConsole command:
cd <Felix-distribution>
export REGMAP_VERSION=0x0500
source setup.sh
cd /path/to/Yarr
bin/scanConsole -l configs/logging/default_and_trace_front_end.json -c configs/connectivity/example_rd53b_setup.json -r configs/controller/felix_client_pixels.json
This will generate a default chip configuration called rd53b_test.json in the directory configs/. Please make sure to use correct rx and tx channels in the chip connectivity file configs/connectivity/example_rd53b_setup.json. Now, we have to make a few adjustments in the rd53b_test.json to enable running scan with YARR, mainly to set the correct data rate, CML bias settings for a good eye openingin the data and disable register read and chip name check. Follow the instructions here - Configure ITkPixel v1.1 SCC.
Finally, to run YARR scan (e.g. digital scan), in a new terminal with FELIX environment setup:
cd <Felix-distribution>
export REGMAP_VERSION=0x0500
source setup.sh
cd /path/to/Yarr
bin/scanConsole -l configs/logging/default_and_trace_front_end.json -c configs/connectivity/example_rd53b_setup.json -r configs/controller/felix_client_pixels.json -s configs/scans/rd53b/std_digitalscan.json -p
¶ Installing FELIX software, firmware and driver
-
For setting up the latest FELIX software felix-distribution, please follow instructions in the Felix-distribution installation page.
-
For installing the FELIX driver and firmware, please follow instructions on this Installing FELIX driver, firmware and software page.
-
For first time setup and details on hardware specifications, please refer to the page here.
¶ Configure FELIX
Follow instructions here.
Once the FELIX card is configured properly, one should have link alignment with the main LPGBT chip of optoboard (provided latter is powered up).
If you run the command flx-info -c 0 LINK, the output should look like as follows, where the alignment is indicated as 'YES' for channel 0 (one of the LPGBT chips).
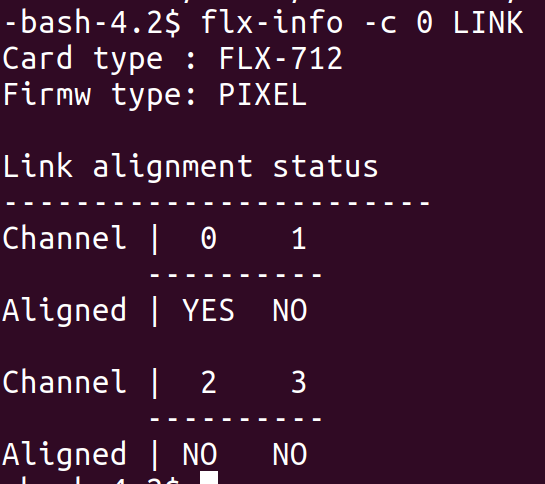
where -c 0 indicates the device number for the FELIX card.
You can also check the status of the miniPODs by running the command flx-info -c 0 POD, where the output should look like as follows:
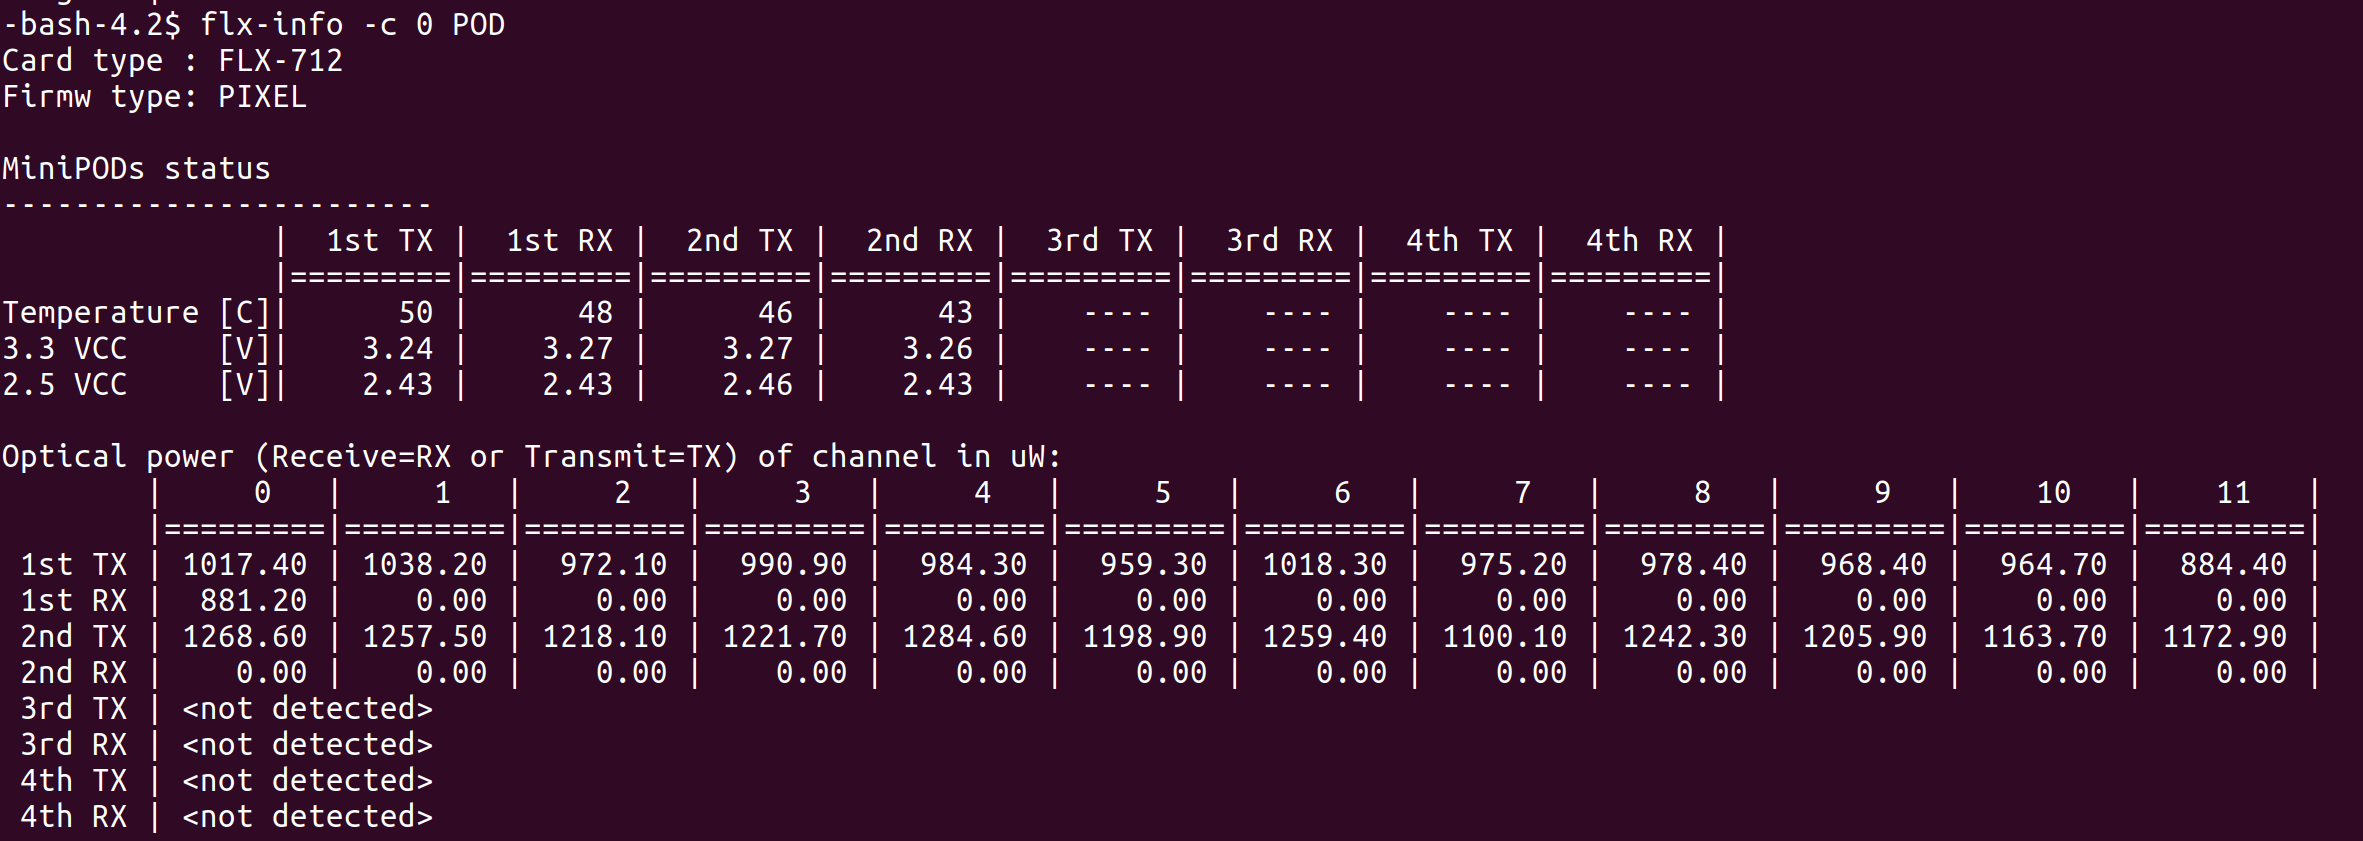
You can see power of light signal in the 1st RX channel (main LPGBT chip).
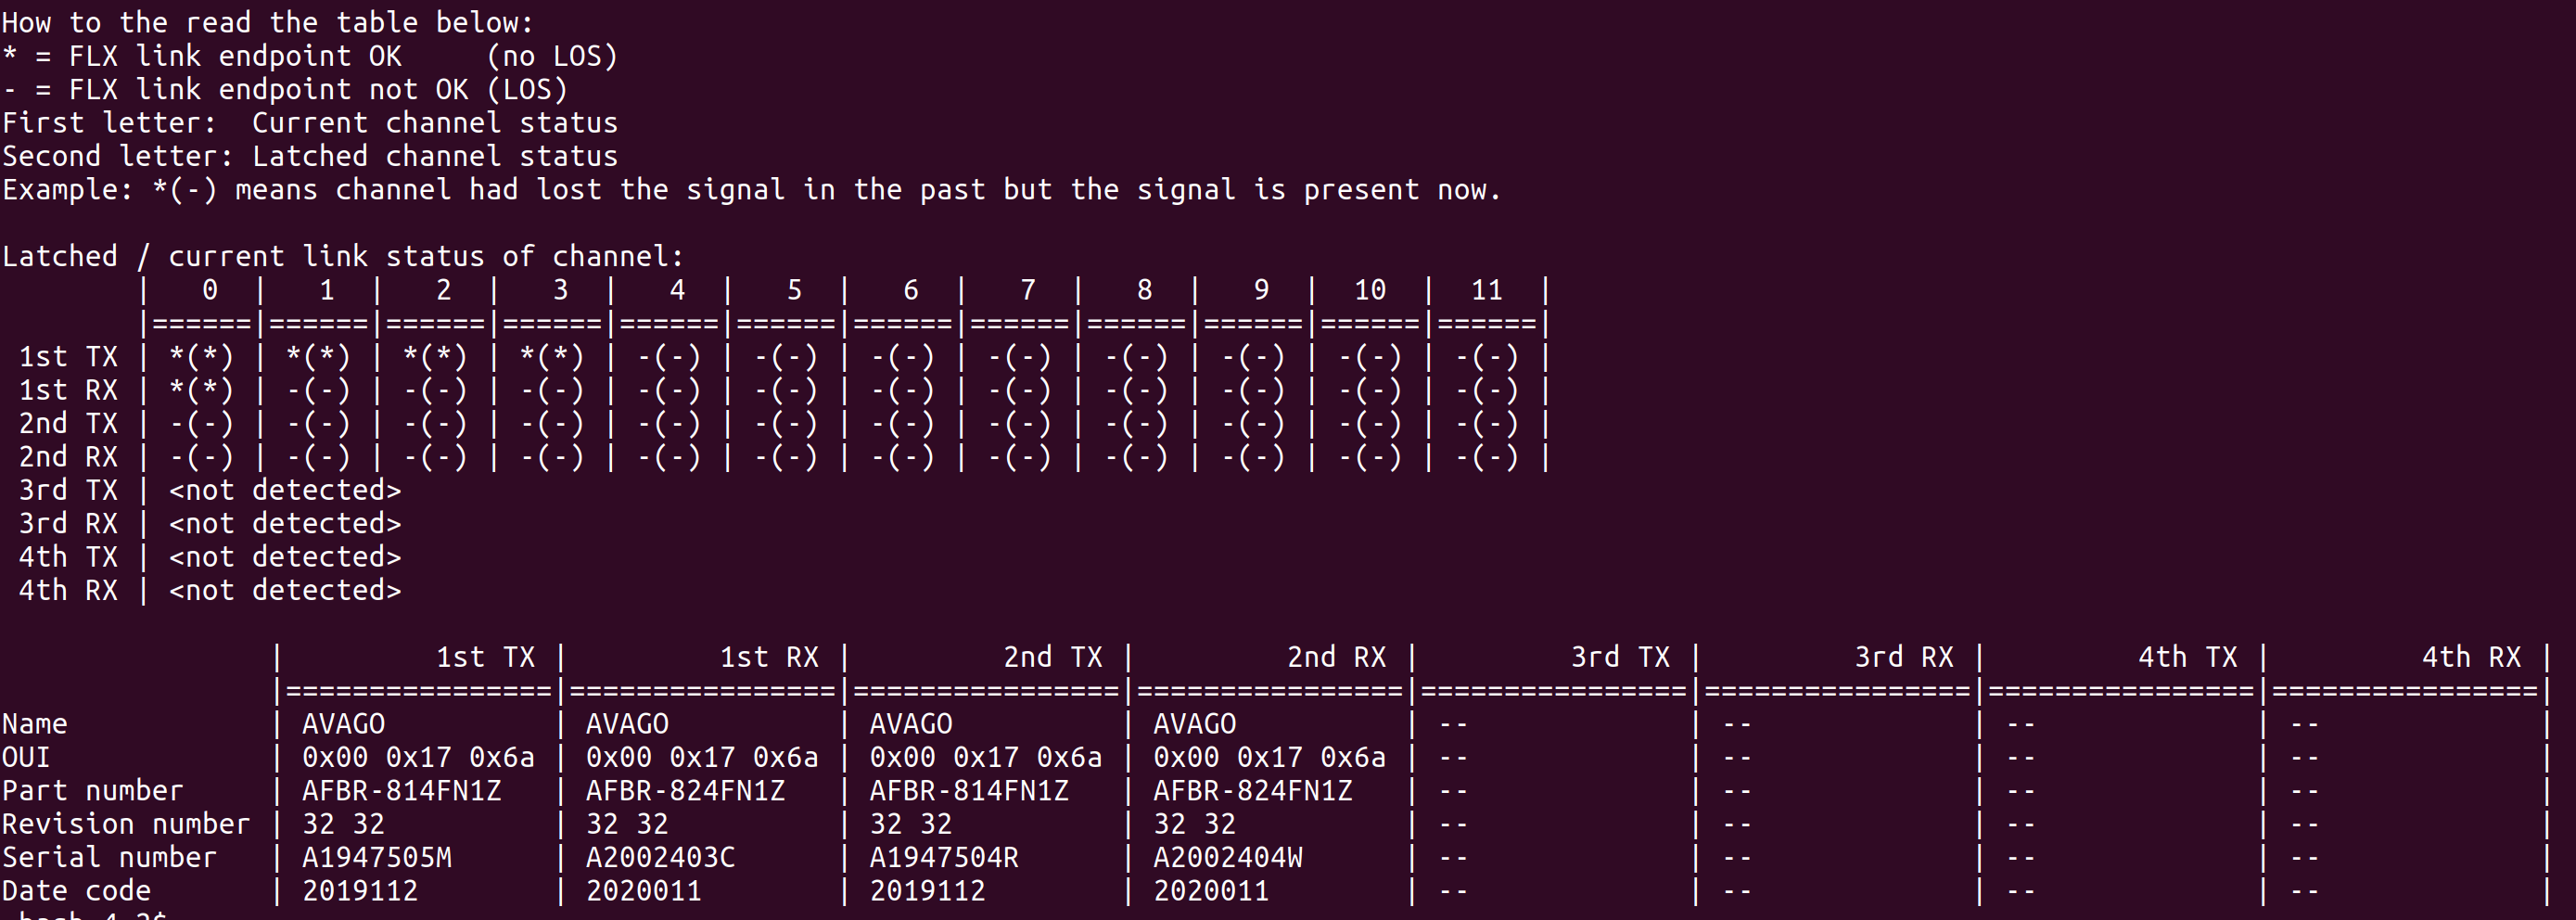
Here you can check the link status of the channel.
¶ Configure Optoboard
Follow instructions here.
Once the optoboard is fully configured, you should be able to see phase alignment of optoboard (or FELIX in turn) with the FE chip. You can check this the following way: flx-config -d 0 list | grep DECODING_LINK_ALIGNED
¶ Configure FE (ITkPixV1.1 SCC or Quad module)
The default chip configuration needs to be adjusted to be able to run with FELIX setup at 1.28 Gbps. This can be done by setting the chip register CdrClkSel=0.
Next, in the configuration, set CMLBias0 = 800, CMLBias1 = 0 and SerEnTap = 0. Also, optionally, ensure SerSelLane is set to 3 for lanes which are not enabled via SerEnLane. This will be set in a more automated way with the new functionality to run eye-diagram scans and CML bias scans (will be updated soon, link to latest presentation ITk week May 2025 for current status).
¶ Enabling chip read-register functionality with FELIX
- IMPORTANT: need to filter out auto read register data from felix software after FELIX conifguration but before starting felix-star processes,
flx-config -d 0 set DECODING_MASK64B66BKBLOCK=0x0 - Set
ServiceBlockEn=1in the chip configs, and also good to changeenforceNameCheck=truejust to make sure you are reading the correct chip (by reading the efuse register) from the appropriate rx lane. - Add
regRxfield to the connectivity config (e.g. file) for each of the chips with a value ofrx+1(see slide 3 of this ITk week Sep 2024 talk) - Make sure to enable the FELIX registers, as well as setting the correct encoding/decoding pattern corresponding to rx+1 channel when configuring FELIX
¶ Benchmark setup at LBNL for multi-module readout